Presenting

How to use the studio phone

Posted by Beth Carr on

In the studio there is a phone that can be used for interviews and features. This will mainly be on air but there is also a way to pre-record phone interviews if you can find a time to use the main studio outside the schedule. This post will focus on using the phone for on-air, live content. PLEASE NOTE: The phone system is being constantly developed and altered to make it easier to use and these instructions will be updated periodically.

How to use the studio phone

How to use the studio phone – click on the image for a larger version

The full instructions are on the training document on the left – you can save the image for future reference but it is also included here.

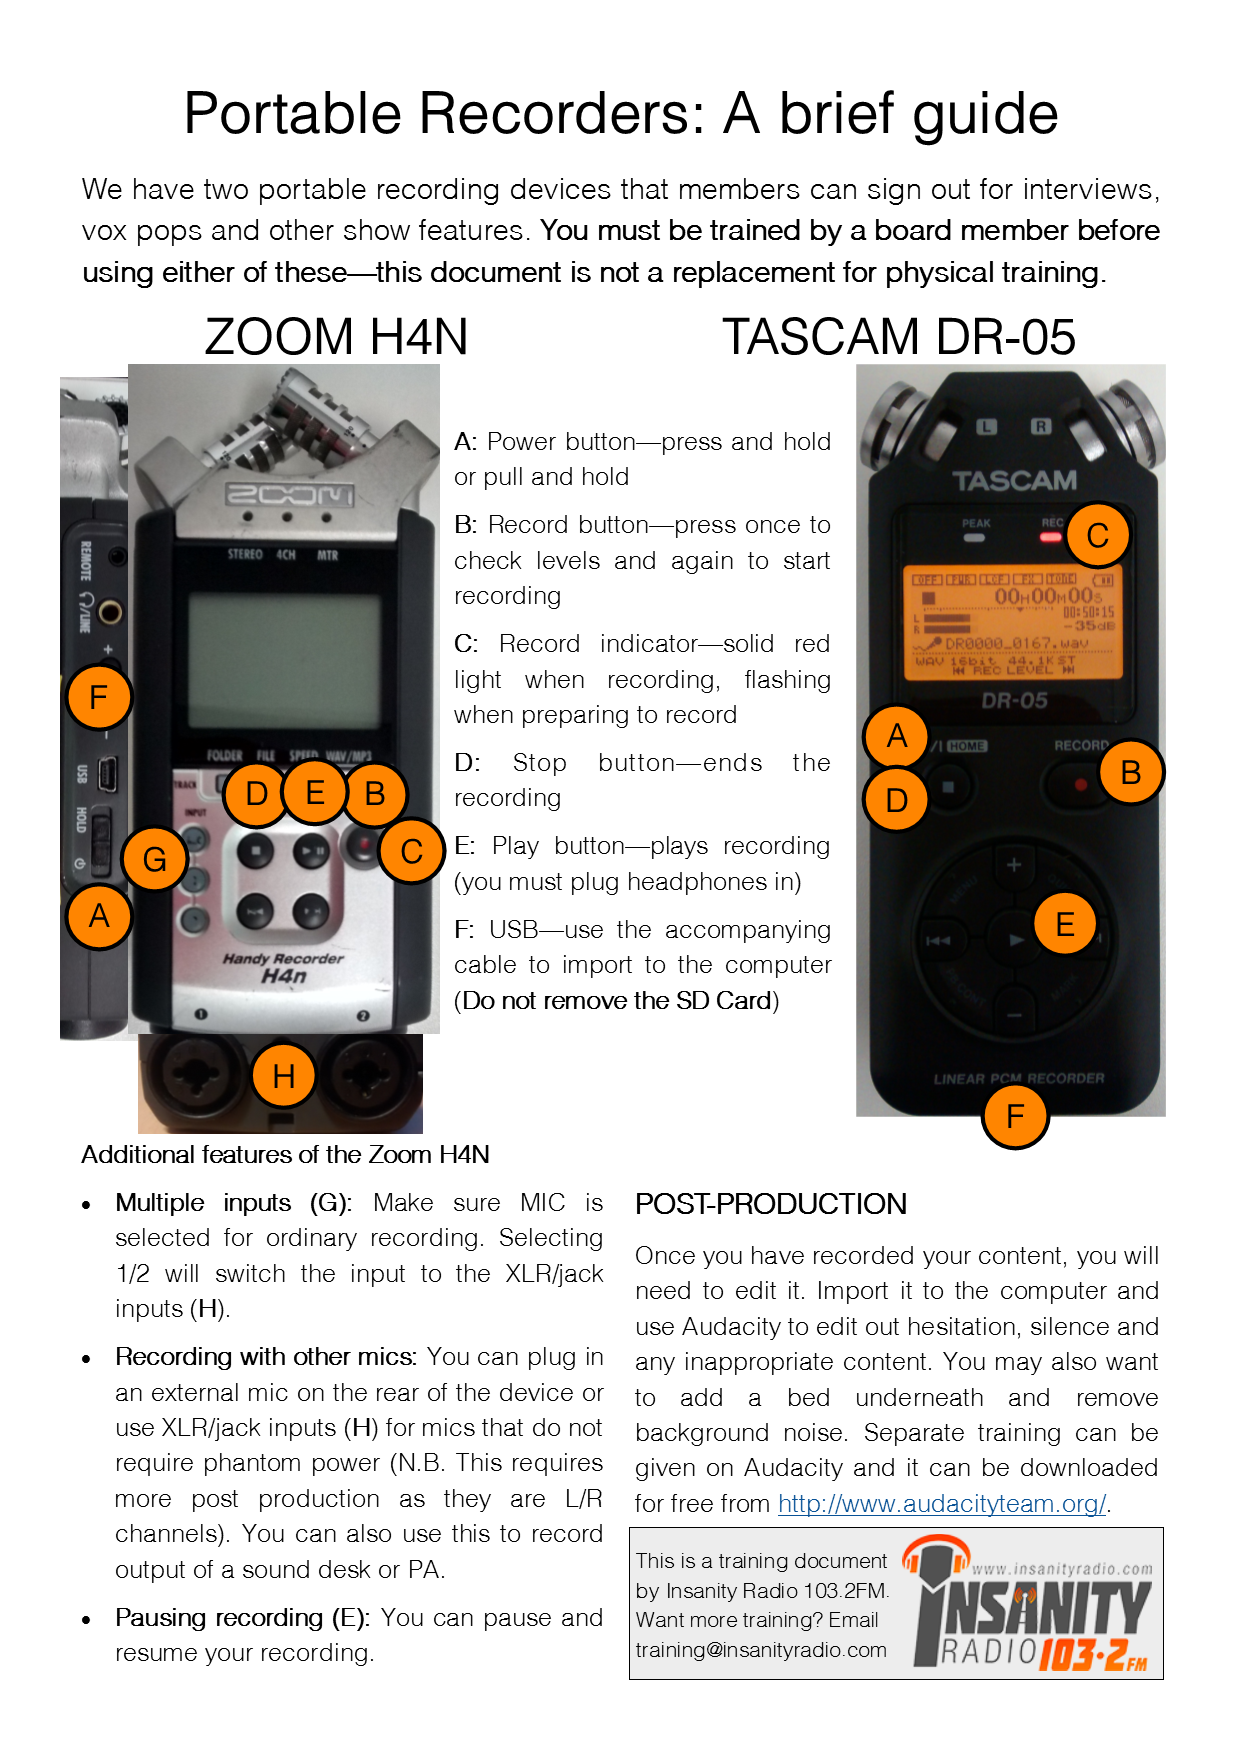
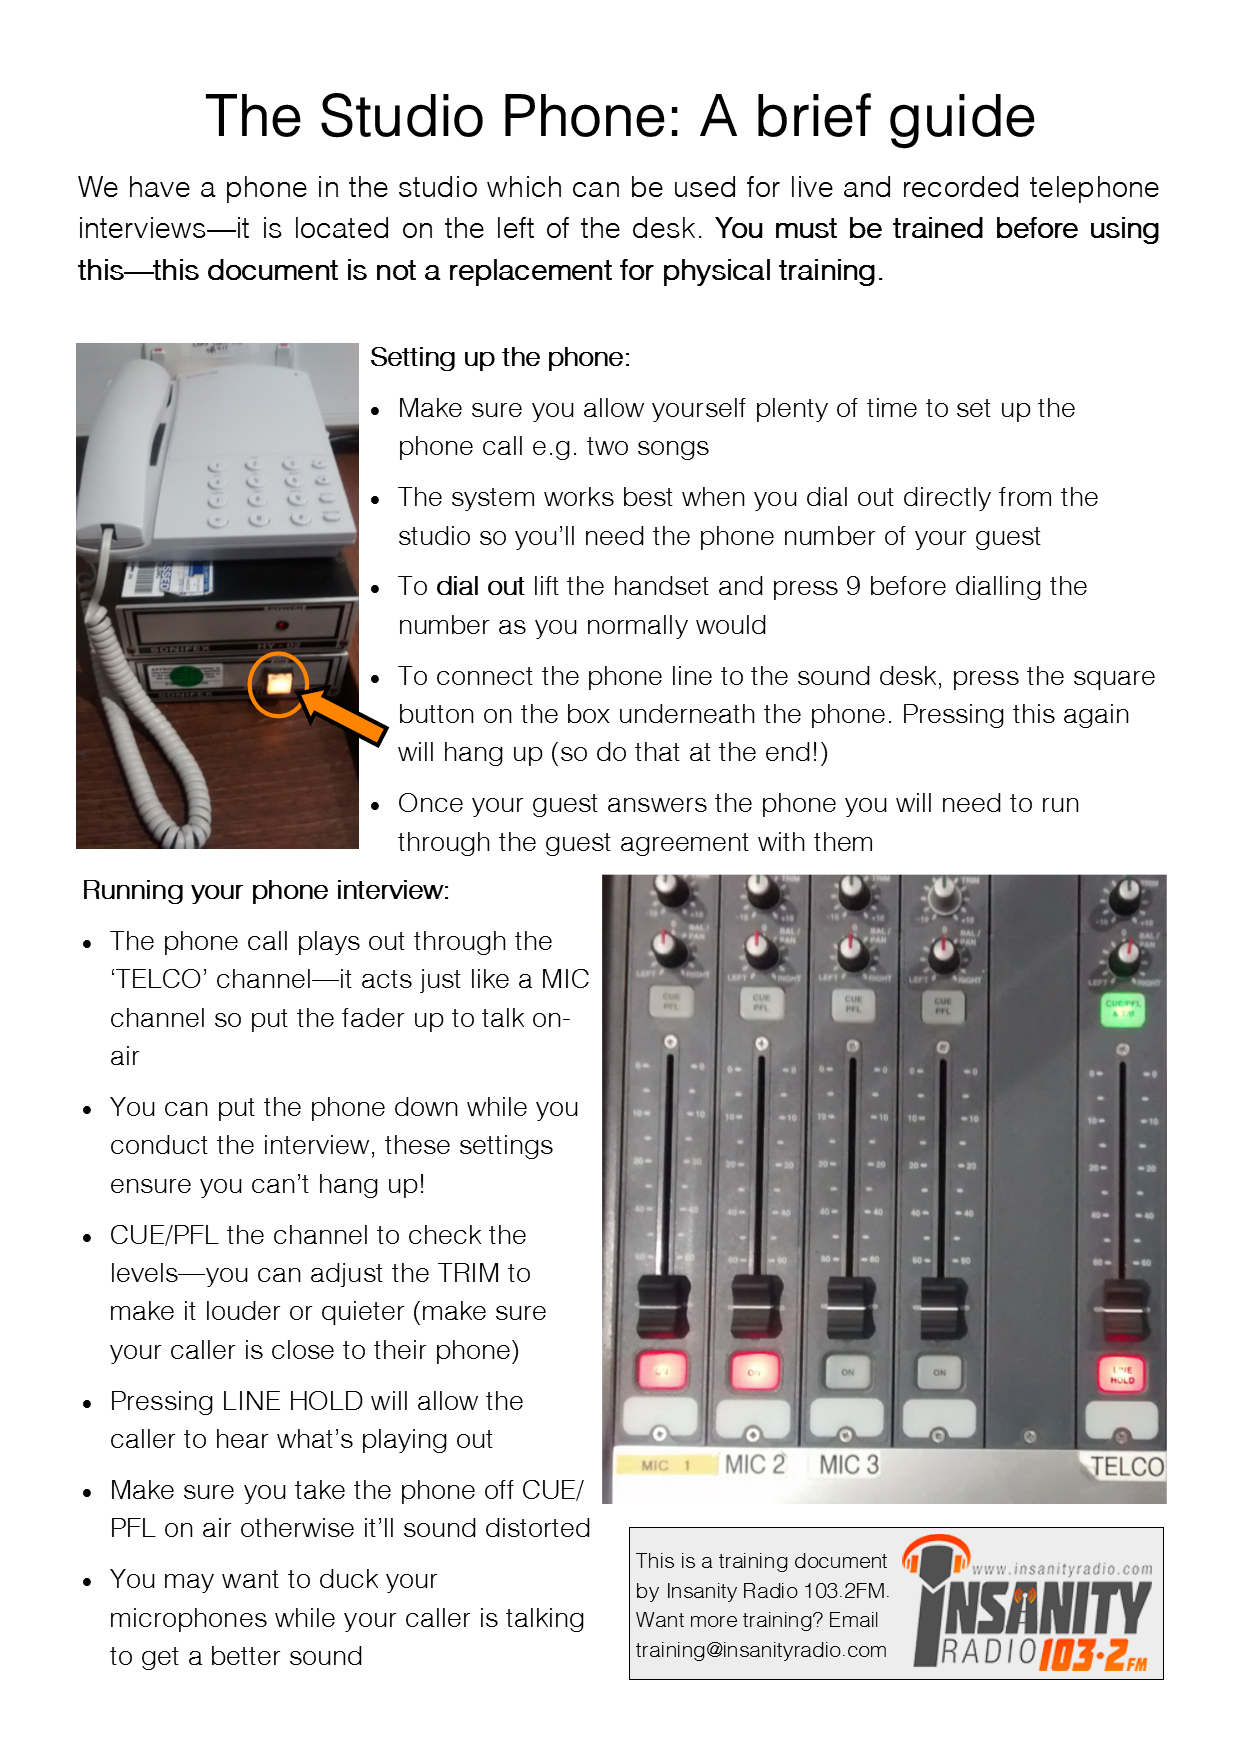
Setting up the phone:

  • Make sure you allow yourself plenty of time to set up the phone call e.g. two songs.
  • The system works best when you dial out directly from the studio so you’ll need the phone number of your guest.
  • To dial out lift the handset and press 9 before dialling the number as you normally would. Make sure there is a tone before you dial – if the line is dead your call won’t go through so you may need to put the phone down and press the square button a few times to reset it.
  • To connect the phone line to the sound desk, press the square button on the box underneath the phone. Pressing this again will hang up (so do that at the end!)
  • Once your guest answers the phone you will need to run through the guest agreement with the guest.
  • We don’t accept calls direct to the studio but it dials out on 01784 430005.

Running your phone interview:

  • The phone call plays out through the ‘TELCO’ channel—it acts just like a MIC channel so put the fader up to talk on air.
  • You can put the phone down while you conduct the interview, these settings ensure you can’t hang up!
  • CUE/PFL the channel to check the levels—you can adjust the TRIM to make it louder or quieter (make sure your caller is close to their phone).
  • Pressing LINE HOLD will allow the caller to hear what’s playing out – only do this when you’ve finished talking to them about the interview as they will struggle to hear you!
  • Make sure you take the phone off CUE/PFL on air otherwise it’ll sound distorted.
  • You may want to duck your microphones while your caller is talking to get a better sound.

Other tips:

  • Calls tend to be VERY quiet. Make sure your caller is close to their handset and speaks loudly and clearly. You can turn up the TRIM and also the EQ dials above but make sure these are reset after the call.
  • If you have pre-arranged your interview, send a copy of the Guest On-Air Agreement beforehand so your guest has a chance to understand it – it will also cause less stress with you explaining it before the call.
  • There is a talkback facility that allows you to speak to your guest off-air via MIC 1 without having the handset. This is still in testing and training will be updated when it is less complex. You can still use CUE/PFL to check levels whilst speaking to your guest off-air via the handset, but make sure the handset is kept away from the mic otherwise it will feedback.
Presenting/Production

How to use the portable recorders

Posted by Beth Carr on

One way to get content for your shows is to record clips outside of the studio and we have two recorders that you can use to do that – the Tascam and the Zoom. These are especially useful for members of the News Team and the Music Team but anyone can use them as long as you’ve been trained – you can ask your team leader or the Head of Training for this.

Before you use one of the recorders, you’ll need to request it from a board member and then sign it out on the sign out sheet. Make sure you state the purpose and which recorder you are signing out so we can keep track. You cannot take the recorder home overnight and you are responsible for it whilst it is signed out so look after them and report any damage or technical problems to the board so we can sort them out. Make sure you sign it back in when you return it too!

Using the Tascam/Zoom is really easy and the instructions are on the document below – you can click the image for a bigger version and a pdf is available via email!
A guide to Portable Recorders

Nerve

UPLOADING: Extro Points

Posted by Jamie Woods on

When uploading music, it is important that you understand how to use extro points. Using them incorrectly will leave a song sounding horrible on air.

What is an extro point?

It is simply the time in the song where the next song starts to play. If you watch the red countdown on Myriad, zero is the bit of the song you are about to select.

It is also the point where the song will automatically start to fade out over a few seconds. This is because if an extro point is set wrong, it would otherwise lead to a very very horrible overlap.

As you may guess from above, it is very important to pick a good extro point when uploading music. And this will explain how.

How to pick one

To set the “Extro” point, you can either click and drag the little rectangle (it’s portrait and grey) just before where the red starts, or you can click the “Extro” button along the bottom when you have the playback cursor (the black bar that shows where abouts in the song you are) to move the point.

You may notice that Nerve automatically tries to guess one. It’s not very sophisticated, but it tries to predict where the last beat is. If you think it’s wrong, please do move it! You’ll be happy you did later on.

Picking one is rather straightforward, but depends on how it ends. If the song just ends, you should put the extro point on the last beat of the song, just about where the wave starts to end. If you’re confused, check out the below diagrams.

The example on the left isn’t right, as there’s about 3 seconds of the song after the extro marker. The song would then start to fade out and the last beat wouldn’t be very pronounced.

If the song has a Fade or Sustained ending, you should put the extro point about two-thirds of the way into the fade. By design, it will speed up the fade out after that point as the next song is cued. Don’t put it too far left or the ending will sound weird, and don’t put it too far right as there’ll be no graceful segue. See below for another example:


Ta-da!

And finally, a top tip: don’t be afraid to use a Jingle or Sweeper to segue up two songs.

Myriad/Presenting/Production/Uncategorized

Music Won’t Go In The Hour

Posted by Jamie Woods on

If you’re pre-recording a show you may occasionally come across a really weird bug where music will sit outside an hour.

Not to worry, there’s an easy(ish) way to get around it, it just involves digging into menus a bit more than you may be used to.

First, delete the dodgy hour. Right click on the hour’s purple markers and press Delete. It will panic and say “Do you REALLY actually want to delete this? Please no”. Ignore its pleas and continue clicking Yes.

Next, go to Log, Add Hour To Log. Under there, click Add Hour from Carts

File, Add Hour To Log, Add Hour With Carts

This will open the normal “Select Date” dialogue. Enter the hour at the start of your pre-record, select the right date and press ok. You will have to do this again later for the second hour.

Select Date

Next, it will pop up with a really odd looking Audio Wall browser. This is more or less a list of what you see on the left hand monitor.

Double click “1”, or Top Of Show (in orange), to select it.

ss2

Great. Now, just type “1” into the next dialogue (not 10, otherwise it will insert 10 sweepers in a boring order), and press ok.

"How many carts" dialogue - enter 1

That’s it! In the log you should now have an hour starting with the TOP OF SHOW sweeper, just like when you normally plan a show. You will have to do it again to add your next hour of music, but just leave the other hours non-existent so that they can be filled later on with playlist music.

Be sure to change the hour mode to Auto, not LiveAssist or AutoFade. And don’t put stops (red squares) anywhere in your pre-rec.

Myriad/Presenting/Production/Uncategorized

Pre-recording in Studio 2

Posted by Beth Carr on

Pre-recording is nothing to panic about! There are two ways you can pre-record a show – we recommend using the first, SegEdit. Setting up is the same for both methods.

Set Up in Studio 2

  • Before entering the studio, log your music into the time slot when your show will be aired (most pre-records are 2 hours so use two hour long slots) – if an error message appears when you ‘Go To’ your hour, select the ‘Log’ drop down menu on the top left of the screen, then select Add Hour to Log > Add Empty Hour and choose the hour (or two) that you need. You can then drag and drop songs into the hours as usual.

christmas-pre-recording-shows-in-studio-2

  • Sign in to the presenter’s Insanity account on Myriad in studio 2.
  • Make sure all three power switches behind the equipment are turned on in studio 2.
  • Press the ‘AUD’ button above the microphones that are going to be used during the recording – these are the two channels on the far left of the sound desk.
  • ‘Go to’ the hour in the log that your pre recording is scheduled to play on air and make sure it is set to AUTO (it should not be in AutoFade).
  • Press the round ‘PFL’ button above Myriad cart 4 (blue channel, far right of the sound desk). All the Myriad channel faders should be down.
  • On the right of the sound desk are 10 buttons, set out in two columns – press the top two (AUD) but leave all the others.

christmas-pre-recording-shows-in-studio-2-1

1) Using SegEdit: (recommended)

  • Highlight over the song you want to play after your link and open SegEdit (located on the right hand computer screen above the logs).

Pre-recording using SegEdit

  • Press the spacebar to play the end of the track before your link.
  • The recording will start automatically when the microphone picks up sound so make sure you are quiet until you want to start recording. You MUST start the recording before the red line near the end of the track – if you’re not ready to talk, make a noise like a cough or pop to activate the mic (then you can be quiet again). You can see the duration of the recording at the bottom right hand corner of Myriad.
  • Press the spacebar again to start playing the song after the link and then spacebar again to stop the recording.
  • If you are happy with the link then remember to click save!
  • Repeat the spacebar button pressing for all voice links.
  • Once you are finished, right click the top of the hour that contains the time and date and select ‘Export this Hour to a file’ – save it in Computer/Music (M:)/PRE RECORD LOG FILES and save it as ‘Presenter/Show Name Date Time’. Make sure you do this for both hours.
  • Make sure you log out when you are done!

2) Pre-recording into carts: (commonly for interviews or other features)

  • Log into Myriad.
  • Find an empty cart on the AudioWall – 8000-10000 is used for recordings.
  • Right click on the empty cart and select ‘record into cart’. It will automatically start when the microphone picks up audio.
  • Press stop on the bottom right corner of the screen (the recording cart) to end the recording and save it if you are happy.
  • Make a note of the pre-recorded material’s cart number so you can log it with your music in your show.
  • To locate the cart your pre recordings went in to, click ‘Jump’ on the left hand side of the computer screen and type the number of the cart.
  • Edit the name and artist to something more memorable and put the date it will be aired to make sure the cart isn’t accidentally deleted.
  • You can drag your recording into the log as you would with music and use SegEdit to blend it in with the songs.

Beds in Studio 2

  • If you want to add beds to your pre-record, you can do this in studio 2!
  • Choose the bed (or beds) you’d like to use and drag it into cart 1, 2 or 3. Select ‘AUD’ and keep the fader up on the sound desk (these carts are the other three blue channels on the right, next to cart 4).
  • Start playing the bed whilst voice recording (either on SegEdit or into a cart) on the Myriad screen and when you want to talk over it, drag the slider down to between 5 and 10 (it may sound louder on the headphones than it will on air)
  • If you want to talk over an intro to a song, fade out the bed as you would when live and press the spacebar to start the next song on SegEdit.
  • PLEASE NOTE: The ‘ON’ buttons above the Myriad faders do not start tracks as they would in Studio 1 so you have to manually press play for the carts on the screen and then click back onto the SegEdit panel.

Resetting Studio 2

  • Once you are finished with your pre-record, turn off the ‘AUD’ and ‘PFL’ buttons on all the channels you have used.
  • Put the three Myriad channel faders back up and turn off the ‘AUD’ function on the right hand buttons.
  • Log out of Myriad and return the studio to how you found it:

Resetting Studio 2 to broadcast settings

Any problems, email training2.insanityradio.com or ask your producer.

Uncategorised/Uncategorized

The Silence Detector

Posted by Jamie Woods on

Ever noticed something different playing out on the radio/stream than what’s going on in the studio? Chances are you’ve encountered the emergency programme, controlled by the aptly named silence detector.

Essentially, if there’s silence (or very very quiet) output from the live studio for about 20 seconds, the silence detector switches to the emergency programme. Historically, this has been Bohemian Rhapsody, but it’s now shuffled and could be any song from its playlist.

So what counts as very very very quiet? If you leave the studio and Myriad reaches a stop, it will kick in after 20 seconds until the presenter gets a chance to either press Go or talk (or both). Songs that over-use stereo (like Wish You Were Here by Pink Floyd) may trip it if, say, the left channel is quiet. And, finally, songs that just have a really really quiet intro or ramp.

It’s always a good idea when uploading music to make sure that tracks don’t have a long, quiet introduction.

So what do I do if it trips?

Essentially, play some music. If the song isn’t peaking at 5 on the meterbridge (the retro looking dials), adjust the green knob (trim) to turn it up. After about 5 seconds of content in the studio, it will switch back to regular programming.

There’s another silence detector that sits at the transmitter, which will continue to play music on 103.2FM if there’s an emergency at the studio. This one kicks in after 30 seconds of silence, or immediately if the studio goes off air. In this case, the stream will probably sound different to FM.

Presenting/Production

Downloading your show

Posted by Beth Carr on

So you’ve come out of the studio, high on adrenaline and keen to come back next week? Or are you wanting to cry and composing an email to Head of Operations saying you never want to see a radio studio ever again? Whichever one of these best describes you, we highly recommend you download and listen back to your show. Why? Here’s a few reasons:

  • If you feel like it went badly, chances are that there was a moment in your show when something happened to throw you off. Being able to reflect on what you said/did can help you avoid the same situation happening again – perhaps you tried to discuss a topic you weren’t confident about or you struggled to turn the mics on.
  • Having a recording of your show means that you can share it with friends and family, who can give you feedback on what they liked and what they’d like to hear more of. These are the core listeners for your show and can help you gain an audience if they genuinely enjoy what they hear.
  • If you had a particularly good show you can use the recording to create a podcast. This can reach more listeners and those who missed out on your live show can catch up.
  • It’s also a good idea to keep a record of bits of your show that you are particularly proud of. There are multiple opportunities to enter awards, both as an individual or as part of the station as a whole, and these often require demos – basically a compilation of your best bits. If radio is something you want to go into as a career then a good demos should hopefully help you to bag your dream job.

So, how do you find the recordings of your show? Good news is that each hour is automatically recorded, so all you have to do is download the individual hour for your show. To do this, you need to visit logs.insanityradio.com – this only works ON CAMPUS but you don’t have to come to the media suite to do it. The page looks a bit like the one below:

logs

Once you’ve found the homepage, you need to select the day of your show – this is in the format YYYY-MM-DD. This will send you to the page below:

logs2

You then need to find the file for your show – each one is in the format YYYY-MM-DD-TT.mp3 (T meaning time). As shown above, the time in the file name is the start of your show and the time printed at the end is the end time, with the files saved in hour long slots. If your show is two hours long, make sure you save both files! To actually save it, right click on the blue hyperlink and select ‘Save Link As’ or ‘Save Target As’ (depending on your browser) – this will allow you to save the file to your USB stick or directly to the computer.

There will be more training material on podcasting, demos and how you can use your logs later in the term but for the mean time enjoy listening to your shows on the logs!

Myriad/Presenting/Production

Hour Modes – A Quick Overview

Posted by Jamie Woods on

You’ve probably seen and been trained briefly on Hour Modes, but what are they and why are they so important? Let’s explain.

The log (essentially the big playlist that contains ordered songs that’s on the right hand screen) is split into hours. Every hour, the clock essentially resets.

The “TOP OF SHOW” thing that appears when you plan your show is known as a Top Of The Hour/TOTH, and often in radio there are news bulletins exactly at X:00. Usually, we want this to play as close to 00 as possible, otherwise we get either overrun or underrun. Overrun is when an hour has too much content, and underrun is when it has too little.

Both are completely preventable, and I’ll explain how to after we define each of the different modes.

Each hour in the log has a specific mode – one of the following 3. You can change the mode in the studio as you feel fit by clicking one of the 3 buttons on the top right screen.

  • LiveAssist
    This is the only mode where stops (red squares) have an effect. This mode is aimed for hours where a presenter will be in the studio, and automatically loads music into Cart Players ready for them to play to assist them.
  • Auto
    If there are stops in the log, Auto will completely ignore them. This is useful if you have to pop out of the studio for a couple of seconds, but don’t want the system to top it up with music. Overrun and underrun won’t be resolved by this.
  • AutoFade
    (This mode will only work in the studio that’s on air.) AutoFade will try its hardest to automatically time the music to finish EXACTLY at X:59:59. If it can’t, it will fade songs out early. When no presenter is on air, this is recommended, as it is the most accurate. It’s also recommended for pre-recorded shows.
screen-shot-2016-10-04-at-19-18-47

The “Hour Mode” buttons are the three above the top. Note the “On Air” one in green.

What does this mean for me?

When the hour is on LiveAssist, your show will play as normal, even if you’re not in the studio. That means that if the log hits a stop, the music stops, and silence goes out on air. This is very bad and unprofessional.

When planning a show, remember not to change the Hour Mode to LiveAssist unless you’re either:

  • Currently in the studio, or
  • Just about to enter the studio (ie. you’re planning out your show the hour before)

DON’T put the hour mode onto LiveAssist if you’re planning your show a while in advance, and definitely don’t put them in pre-records!

A studio with nothing playing out - disaster!

A studio with nothing playing out – disaster!

When you complete your last link, it is very advisable to put the log back onto AutoFade. This will ensure that you have no overrun or underrun, and is fair on the next presenter, and is the professional’s choice.

Don’t be scared, after a couple of shows this will all become second nature to you! Let us know if you have any questions.

Uncategorised

Welcome

Posted by Jamie Woods on

This blog will give cool tutorials for both presentation, production, etc. not just at Insanity, but for radio in general.

Be sure to subscribe to the RSS feed, and join the Insanity Radio Members group on Facebook, where we’ll keep you up-to-date with the latest ways to present!

Be sure to message a Board member if there’s anything you’d like us to write about!