Here’s a quick guide on how to use the Insanity Player to upload content to the website
First, upload your show to MixCloud like you normally would. You can use any MixCloud account, it won’t matter.
Go to the Insanity Player admin page – https://insanityradio.com/player/wp-admin/
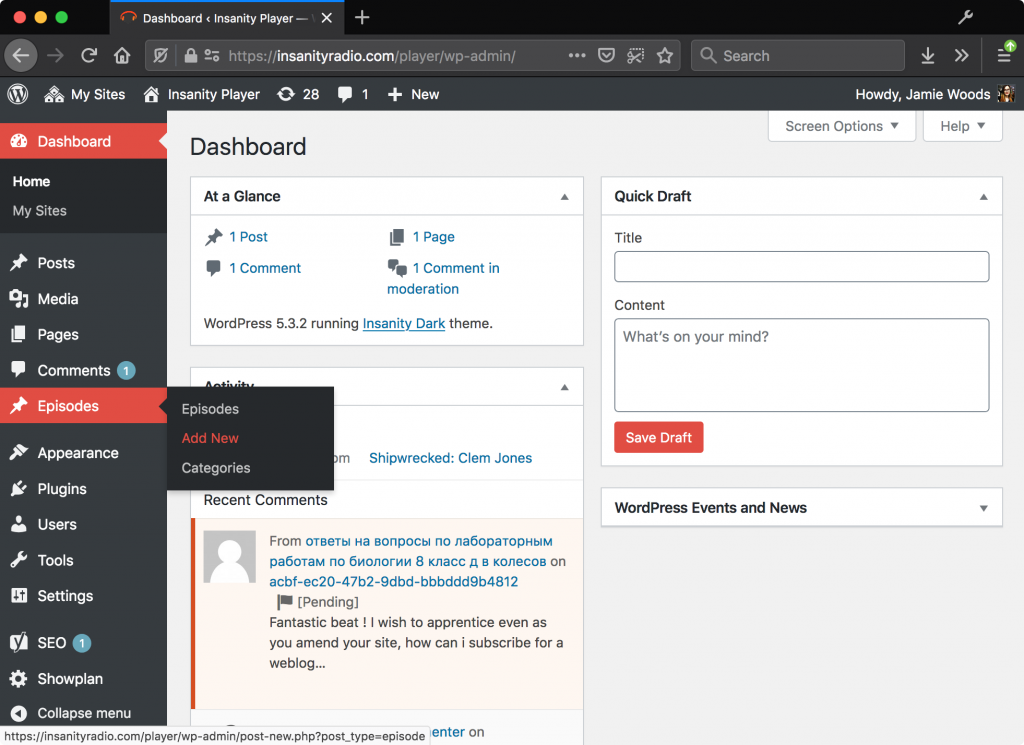
Under “Episodes”, click “Add New”. This will take us to a form that looks like this.
Copy the link to your MixCloud upload, and paste it in the “Programme URL” box.
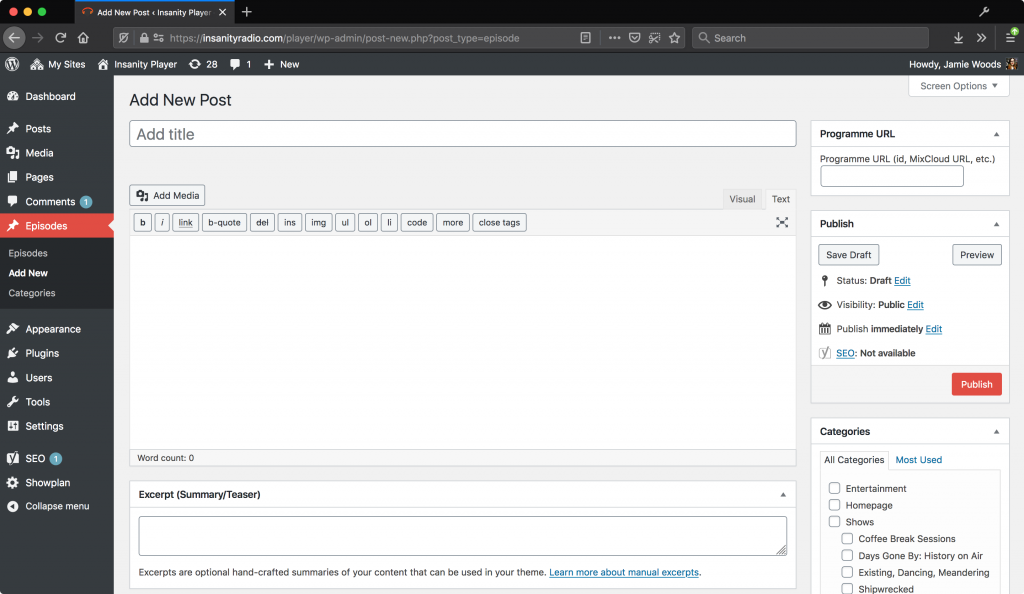
If you don’t have a Programme URL box (this may happen if you’re uploading your first show), click “Screen Options” and make sure that you have the Box for it, like below:
Now we can enter the title, a description, and an excerpt.
We’re nearly there – just two more things to do.
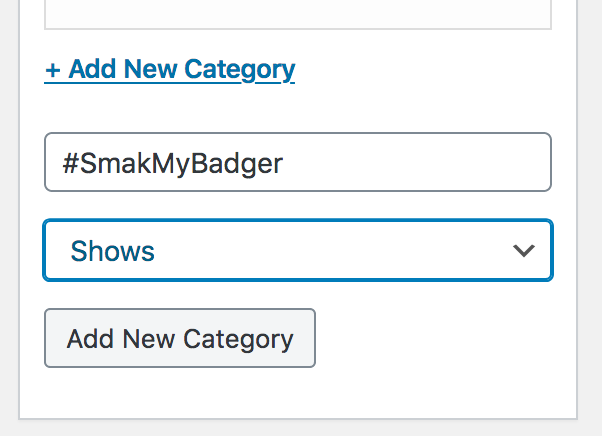
First, we need to select a “Category”. If you don’t see your show in the list, click “Add New”.
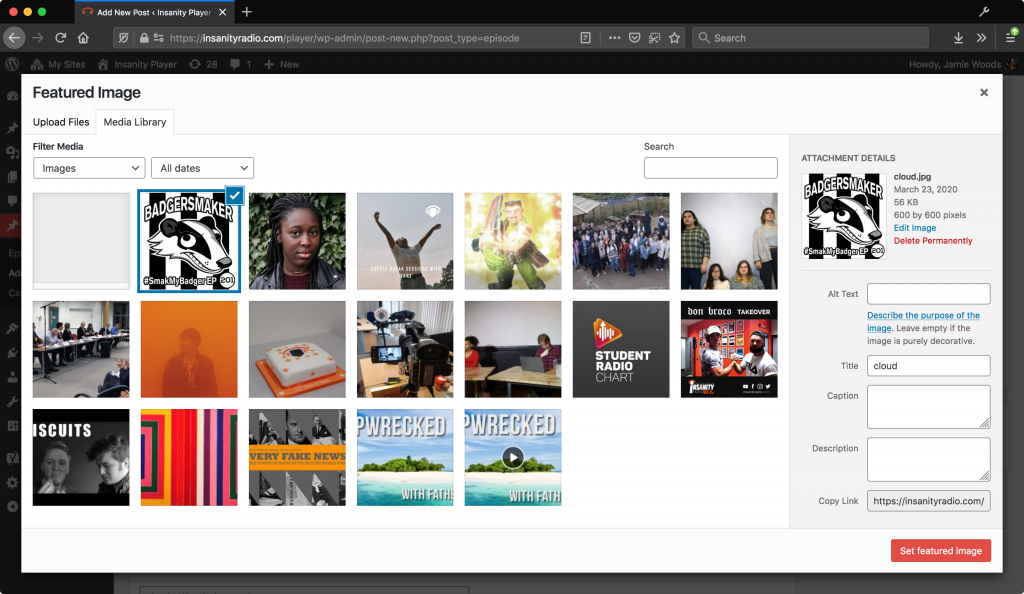
Next, we need to upload a photo. Click Change Featured Image and you can select an image.
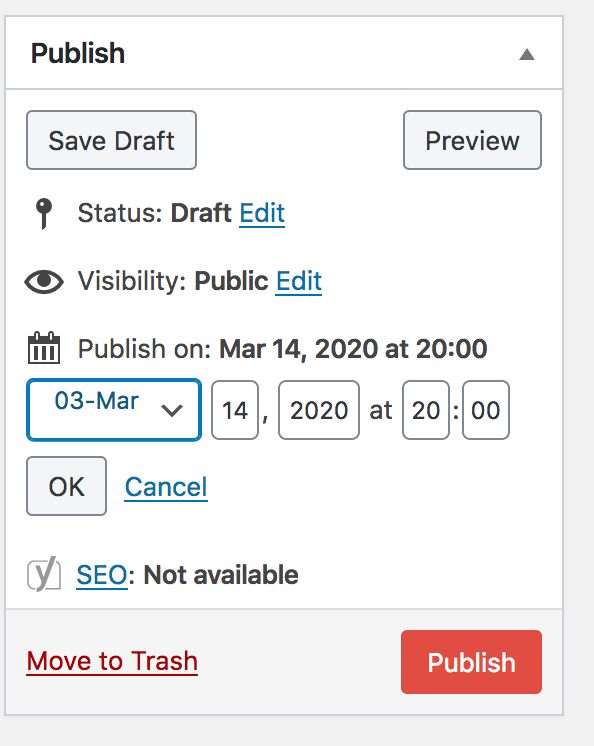
Finally, we need to enter the time it was broadcast. To do this, click Edit next to “publish immediately”.
To conclude, make sure you’ve done the following
Entered a MixCloud URL
Entered a title, description and excerpt
Changed the date to match
Entered a category
Entered a photo
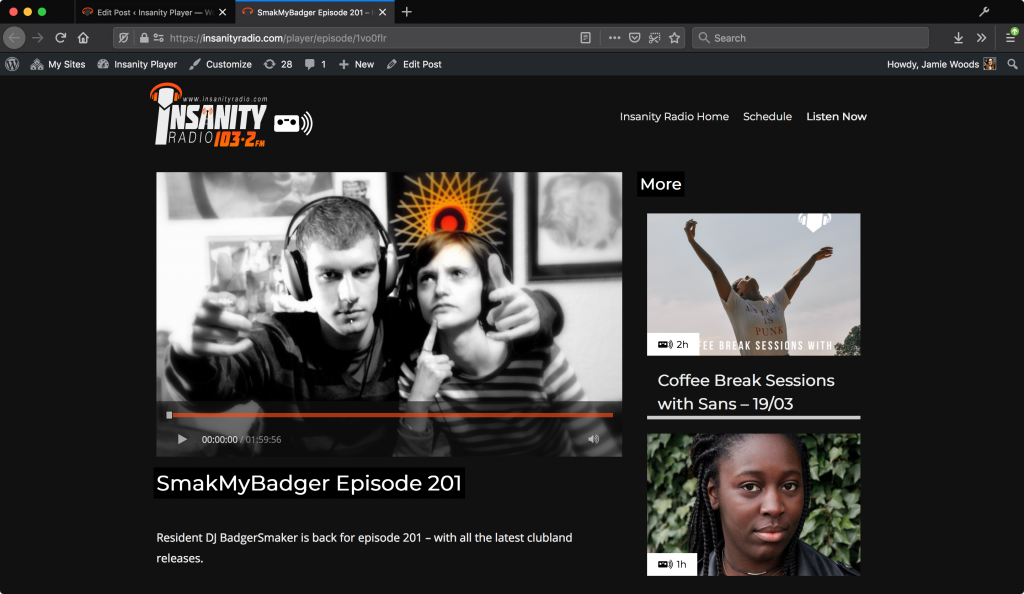
Now, we can click “Publish”, and it will go live immediately! 🎉
If you can’t make it to the studio, the last option is to record your show from home. This post will explain how to do it.
Your Microphone
Before we start, we’re going to need a reasonably good quality microphone. If you’re a media nerd like me (or if you might want to venture into podcasting) you could choose to invest in a good quality microphone, but I’ve had a hunt for some good cheap microphones.
The one built into your laptop or phone (or AirPods) unfortunately is nowhere near good enough. You’re also going to want to be able to use your headphones at the same time so you can hear the music.
We have a few kits that can be borrowed short-term, but in the current climate it may be worth investing in something for the longer haul.
Low Cost
The best quality low cost microphones we can find are here. If you’re doing radio for the first time, have a look at these.
Behringer C-1U (£38) Like many broadcast engineers, I don’t normally have a lot of good to say about Behringer, and have had a lot of bad experiences with their hardware failing just after the end of the limited warranty. But for the price this is a good entry level microphone and is probably the cheapest you can get, and the overall sound quality is good.
Rode Smartlav+(on deal at £38 + £11, £49) The Smartlav is a clip on microphone that sounds incredibly good for its price. However, to use it with headphones on your laptop/tablet you need to purchase an additional £11 adapter which is a bit annoying.
One important note is that the Smartlav only works on laptops that let you use a headset mic like Apple headphone – although most laptops now have headset jacks instead of headphone jacks this could catch you out.
Editor’s Pick: Marantz Pro USB (£49) I’ve heard from a LOT of radio techies that this microphone is just fantastic for the price, and really does give you studio-like quality at an entry-level price.
Higher Cost
To be honest, the more money a microphone costs, the better the sound quality you’re going to get for it. Although there are some exceptions to this rule – some microphones sound incredible at a fraction of the cost. And here they are.
Samson SAQ2U(£79 on Amazon) Samson have been releasing some fantastic microphones over the last few years, and the Q2U has quickly become a podcaster’s favourite. You can plug it directly into your computer with USB, or into another mixer. It has a headphone port built into it too so it’s already better than your phone!
Samson G-Track Pro (£165 on Amazon) This microphone, although our most expensive, is an incredibly strong bit of hardware and, if you want to get that studio quality from home for your show or podcast, this could be the one for you.
You can continue to upload music through Nerve like normal.
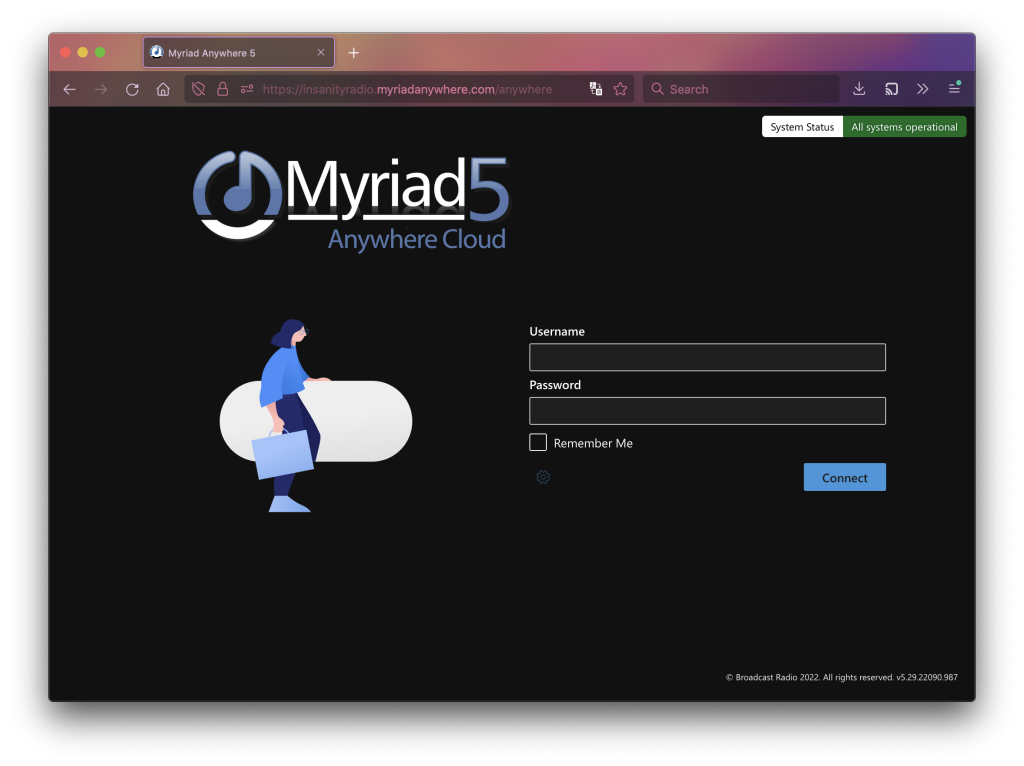
Log in with your normal username and password.
If you get an error message saying your username and password isn’t correct, you might not have the right account set up yet. It’s really easy to do, log onto the Account Portal and you will have the option to enable a Myriad account. It should then work immediately.
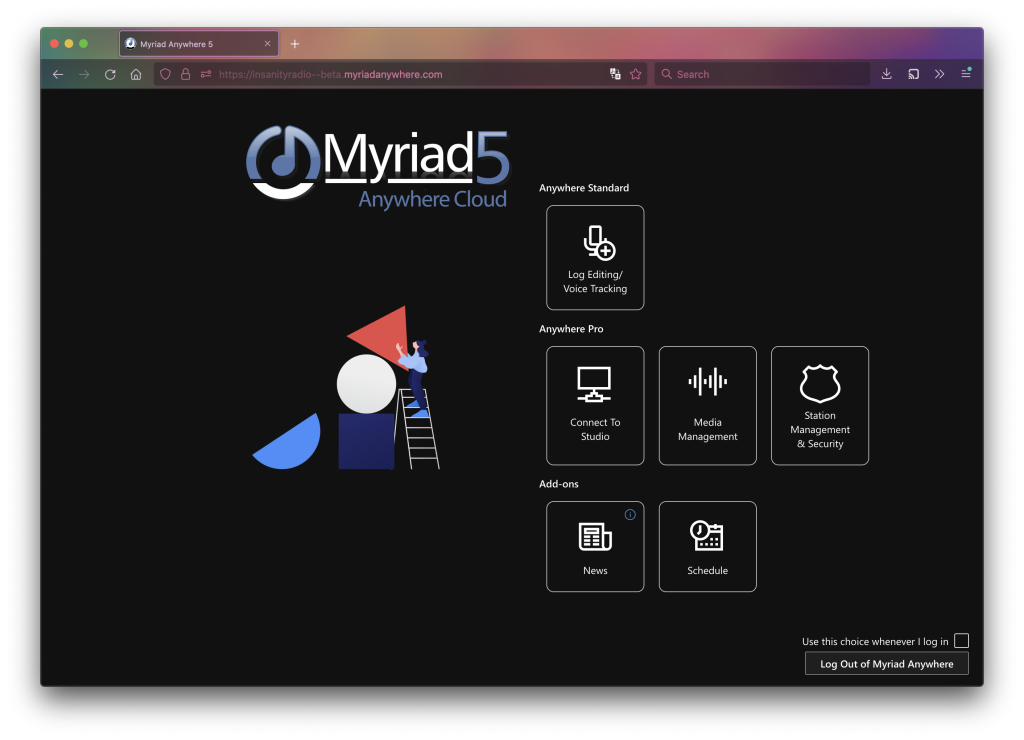
You may be asked to choose an option. Choose Log Editing/Voice Tracking.
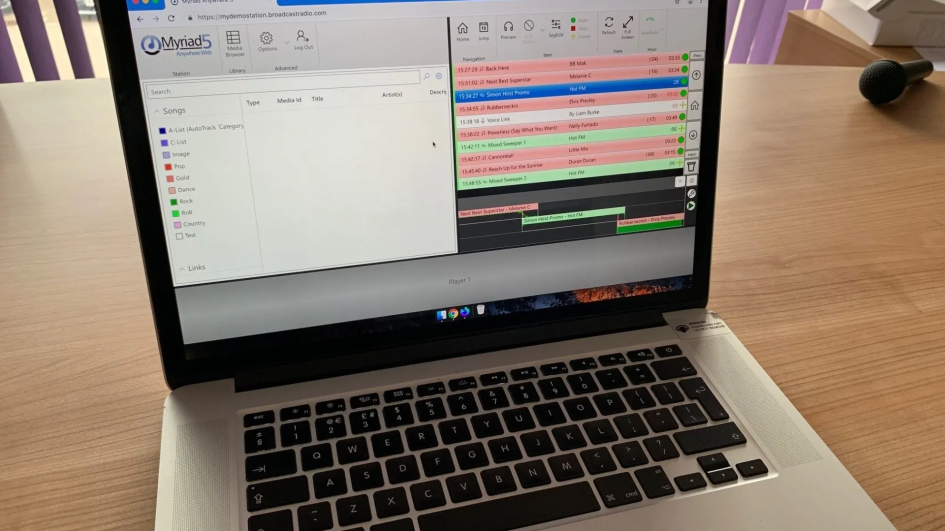
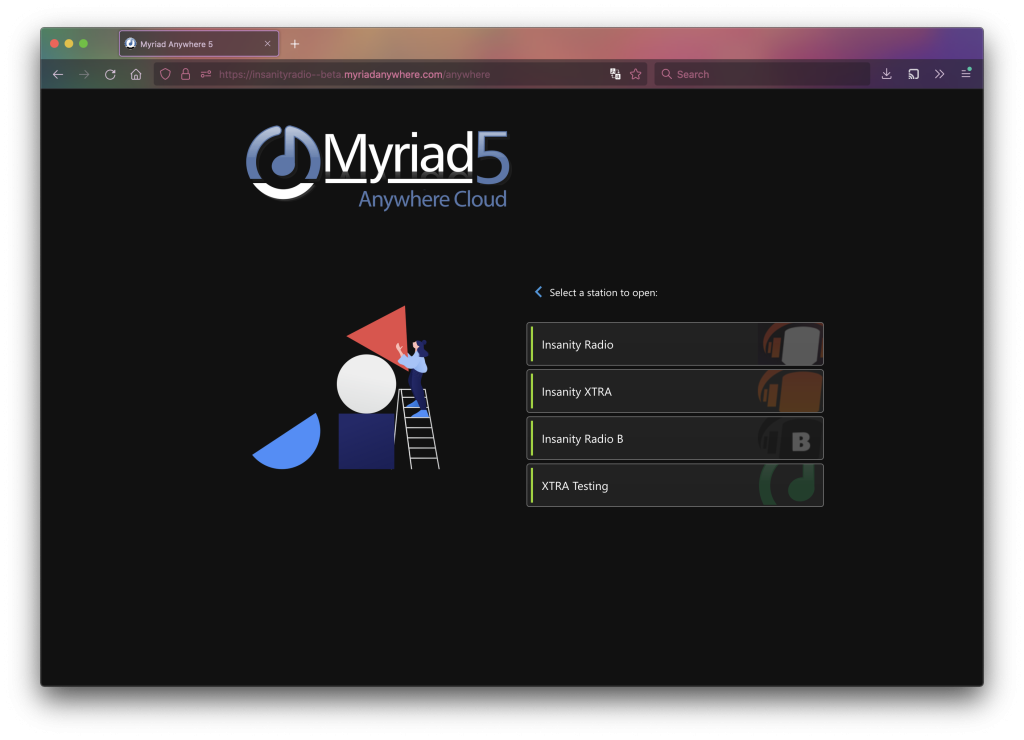
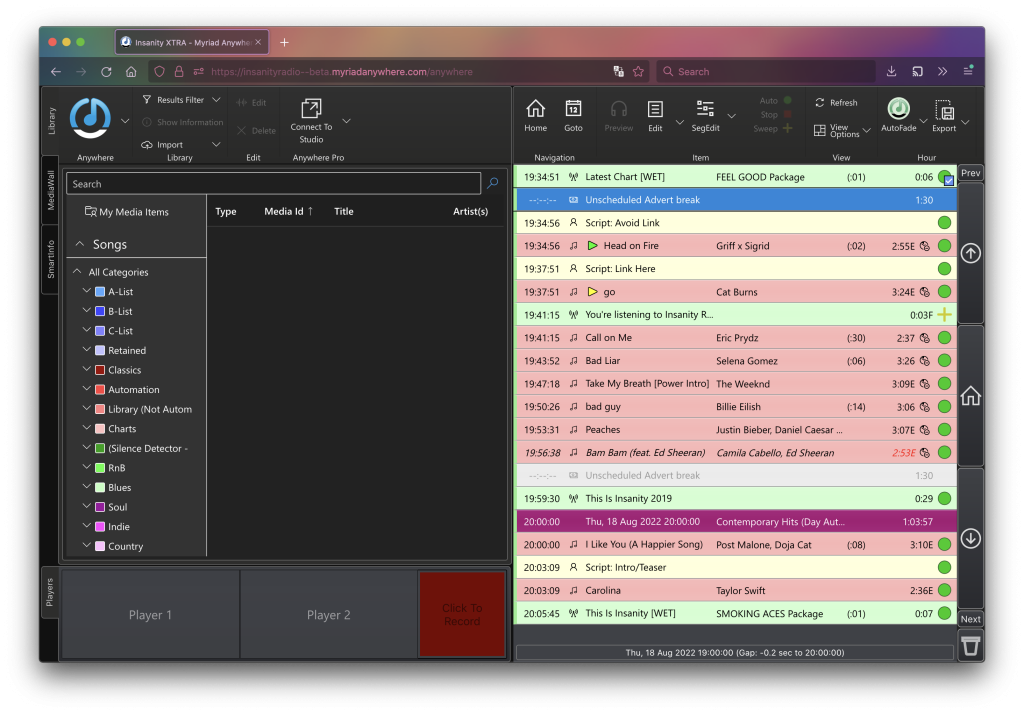
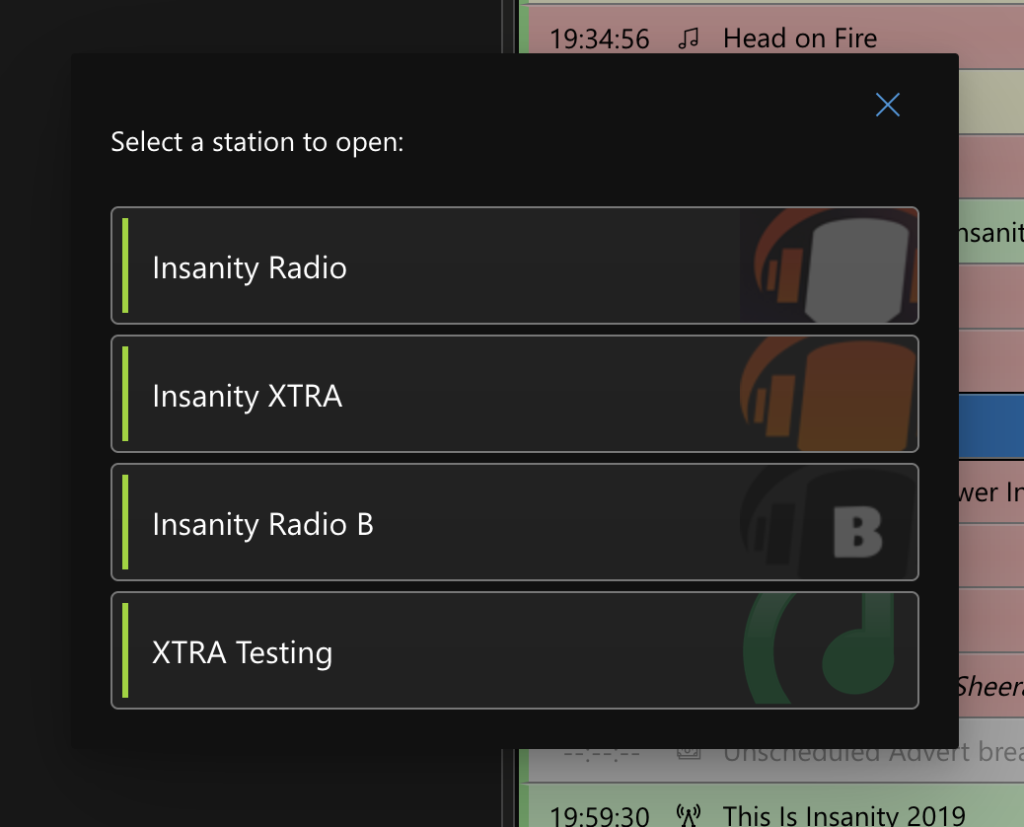
We now need to pick a station to use. First, let’s open Insanity XTRA so we can set everything up and make sure it works! Insanity XTRA is our virtual training station – nothing you record into it will go public.
Once it’s finished setting up, you will see the station log on the right. Because this is “Insanity Training” the log is a copy of all the logs from a few days ago, we can make changes here without having an impact on air.
If you’re not sure you opened the right station, click the top left menu button and press Change Station.
We’re in!
Myriad Anywhere aims to be as close to the desktop experience as possible.
As such, you can pretty much log your show like normal, and by uploading songs through Nerve you don’t need to be on site to record your show!
As we’re on the training database, let’s not start planning our actual show yet, as none of the changes we make will go on air.
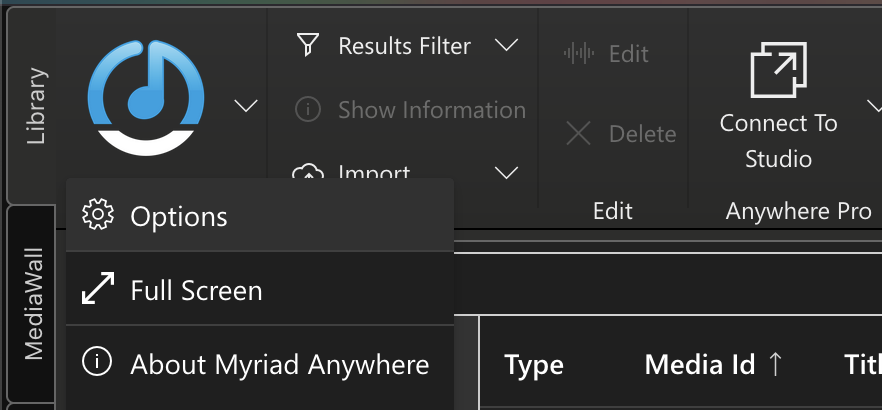
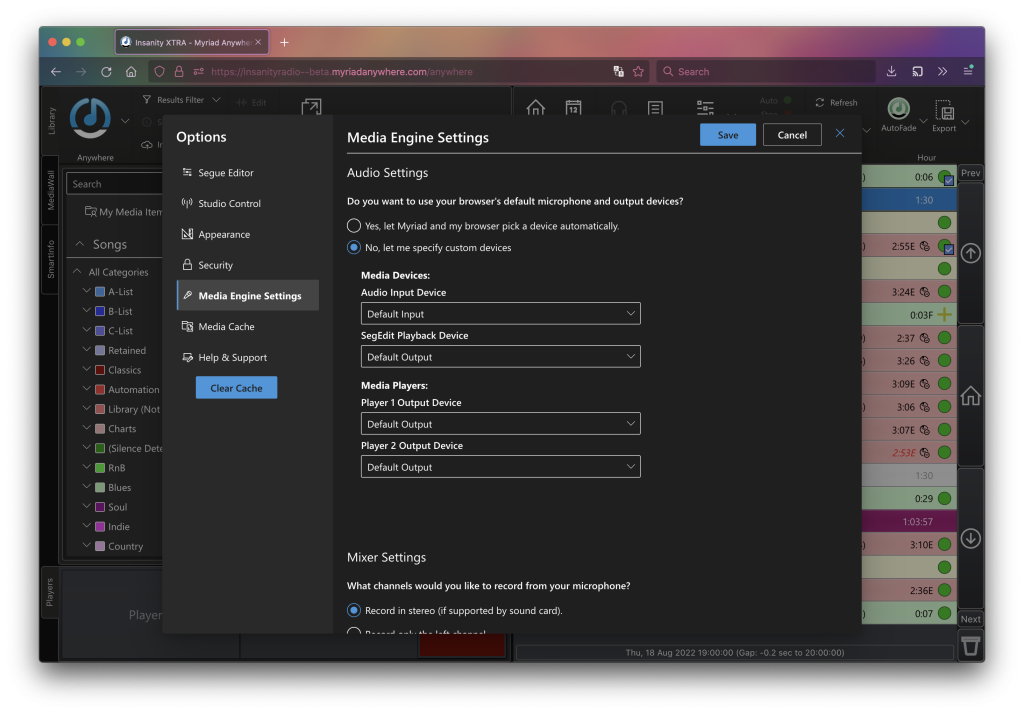
Open the Options menu, and go to “Media Engine Settings”.
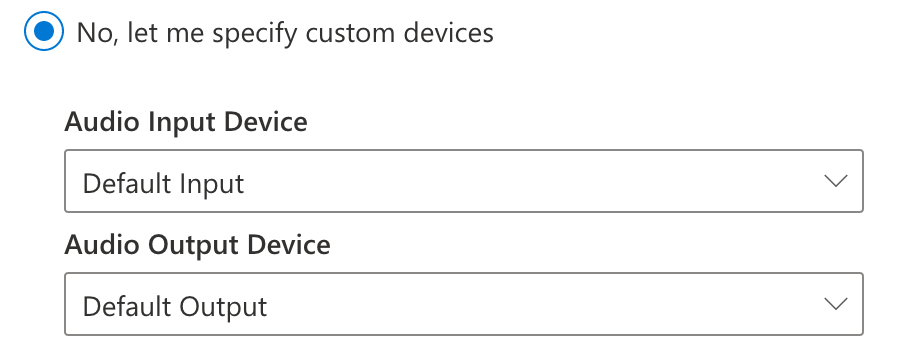
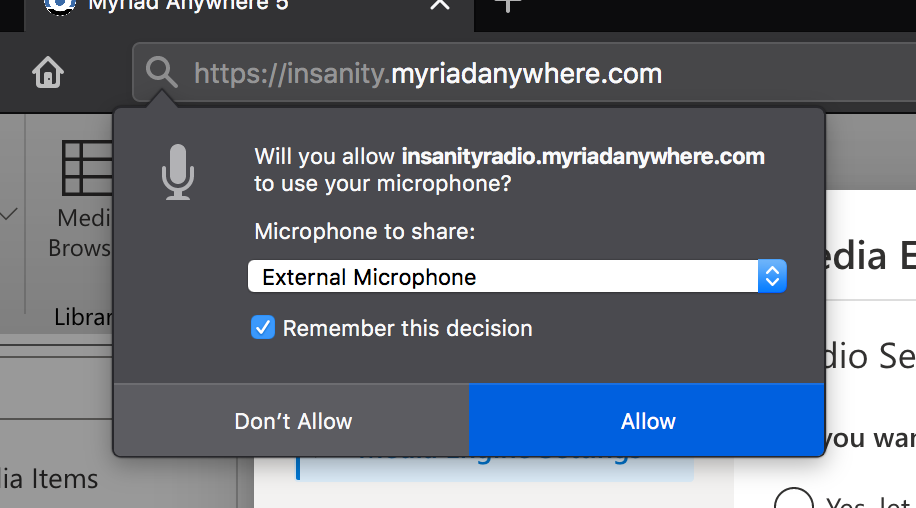
Select “No, let me specify custom devices” near the top. This will let us tell the system that we’re using our own microphone. Otherwise, it may use the one that’s built into your laptop, and the resulting quality would be bad.
If you’re logging in for the first time, you may see this dialog. It’s completely normal to see this, but make sure to check a “Remember” option if it gives you one!
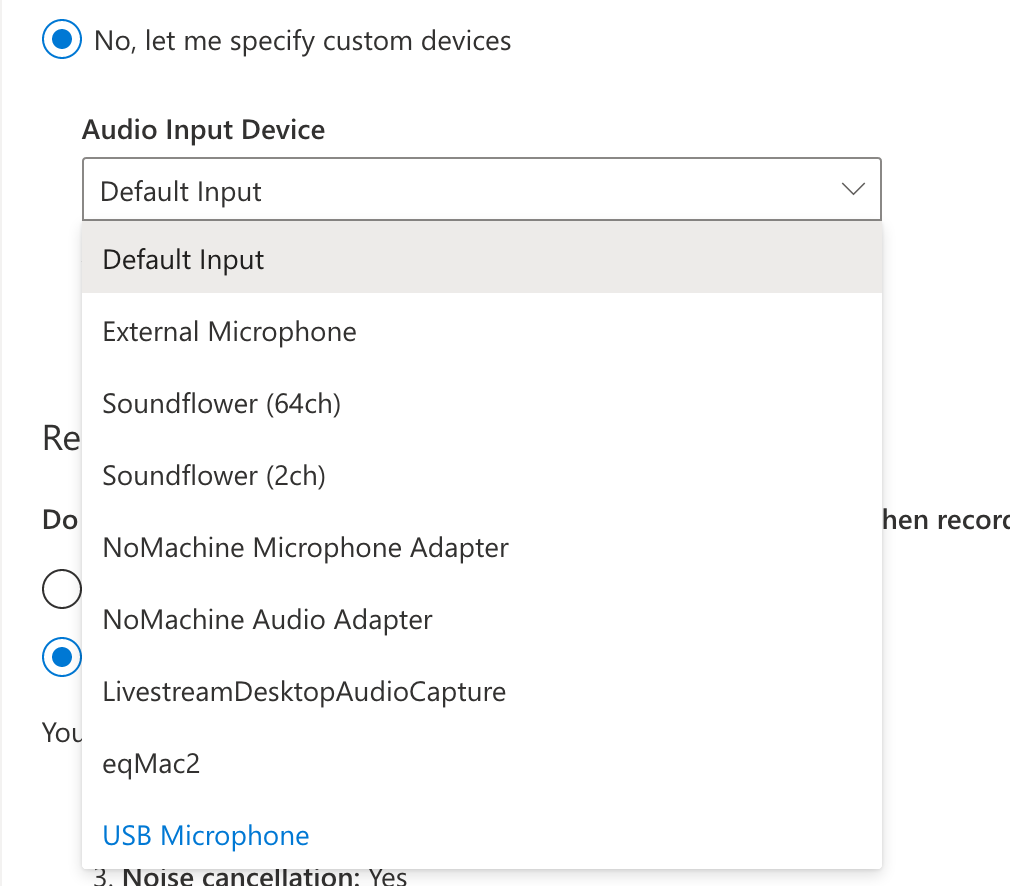
Now let’s click “Audio Input” and find our microphone!
Mine has shown up as “USB Microphone”. Click this and, optionally, change the output device too if you need to (for example, if you have a mixer, or if your microphone has a headphone socket).
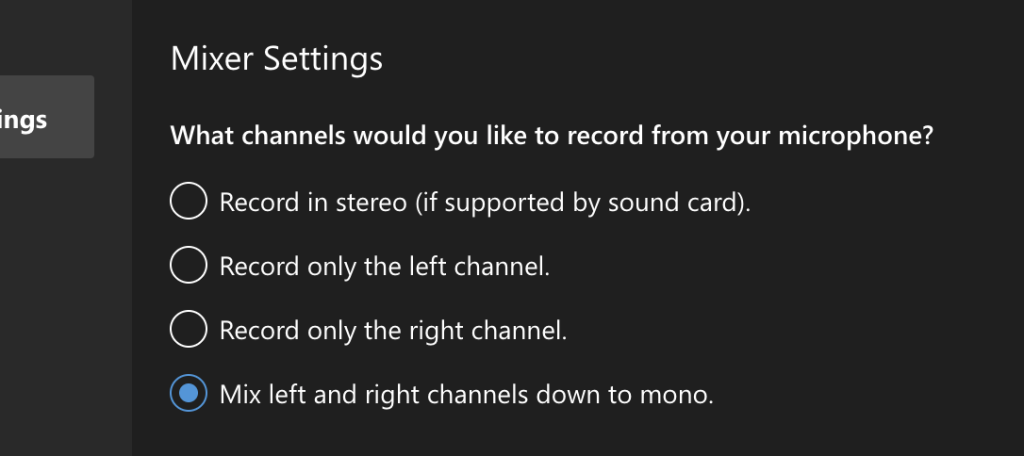
Finally (and importantly) make sure you choose Mix left and right channels down to mono. Some microphones will only record on the left or right side, and this can trip the silence detector. If you have two microphones plugged in, you might get one on the left, and one on the right. By making the microphone mono rather than stereo, this can’t happen.
Then click “Save” on the right to exit the settings window.
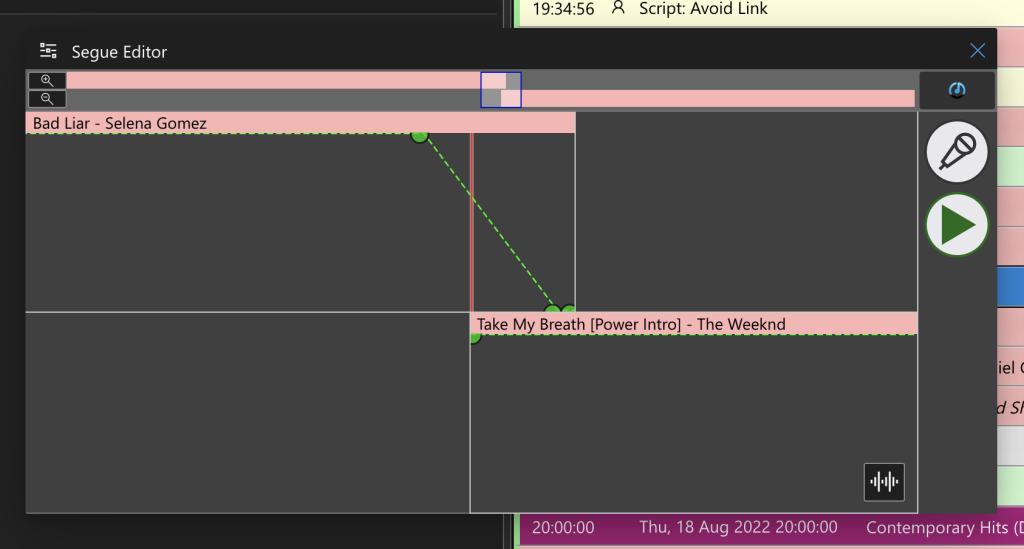
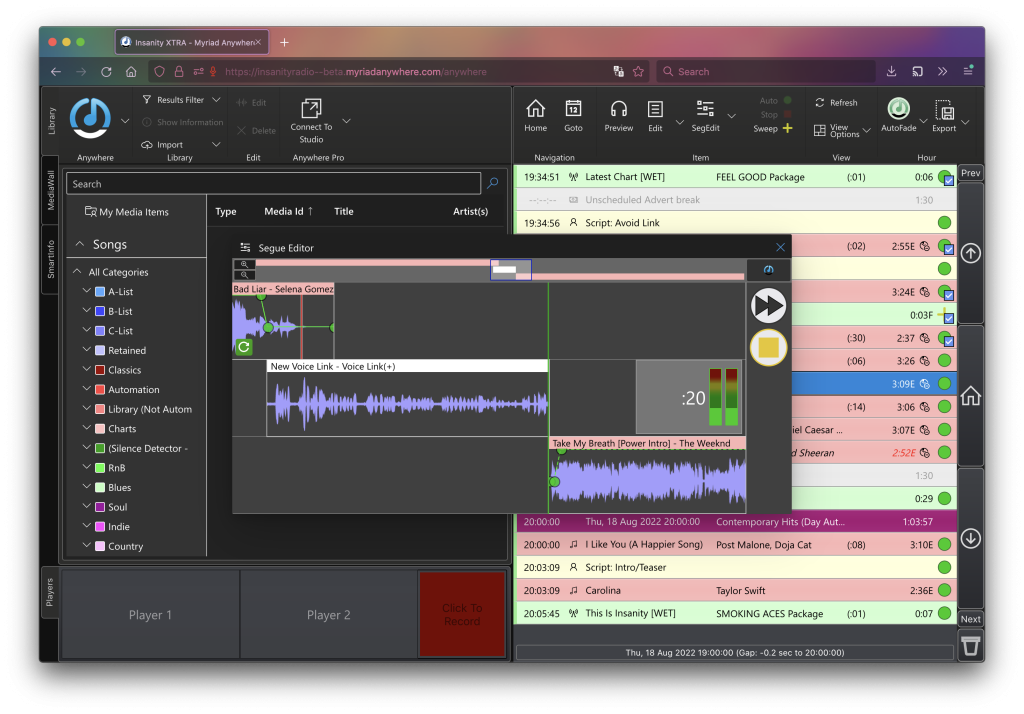
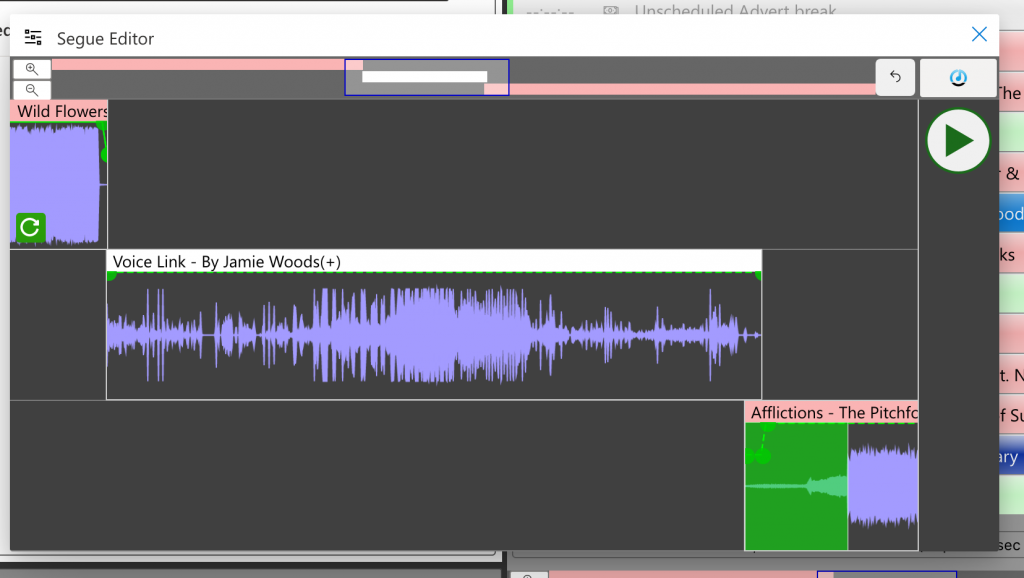
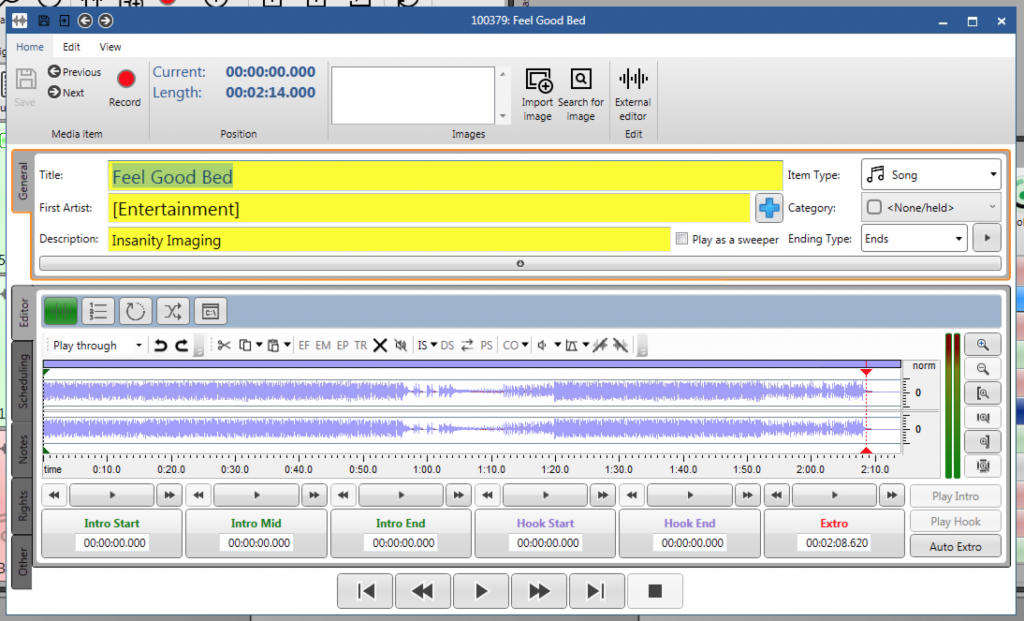
To record a link between two songs, select the song you want to record before and double click it. For instance, if I want to record between Bad Liar and Take My Breath I’ll double click Blinding Lights.
This will open the “Segue Editor”.
To make loading faster, songs might appear blank like in the following screenshot. This is normal – you can click the “wave” button on the bottom and the system will download the songs for you.
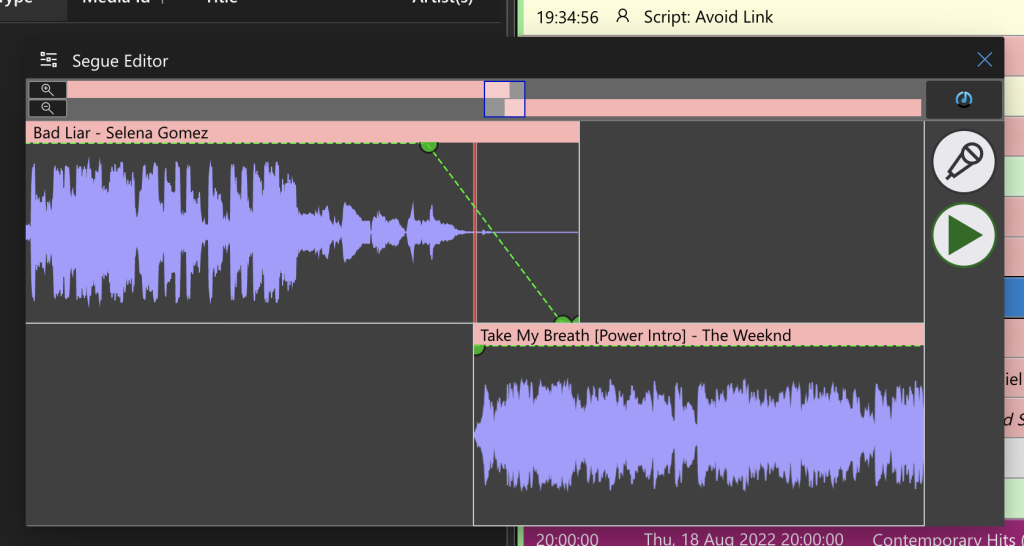
Once the downloads have completed (this might take a few seconds depending on the speed of your internet), we can now see the songs! 🎉
Click the “Play” button to have a listen to the segue as it would sound.
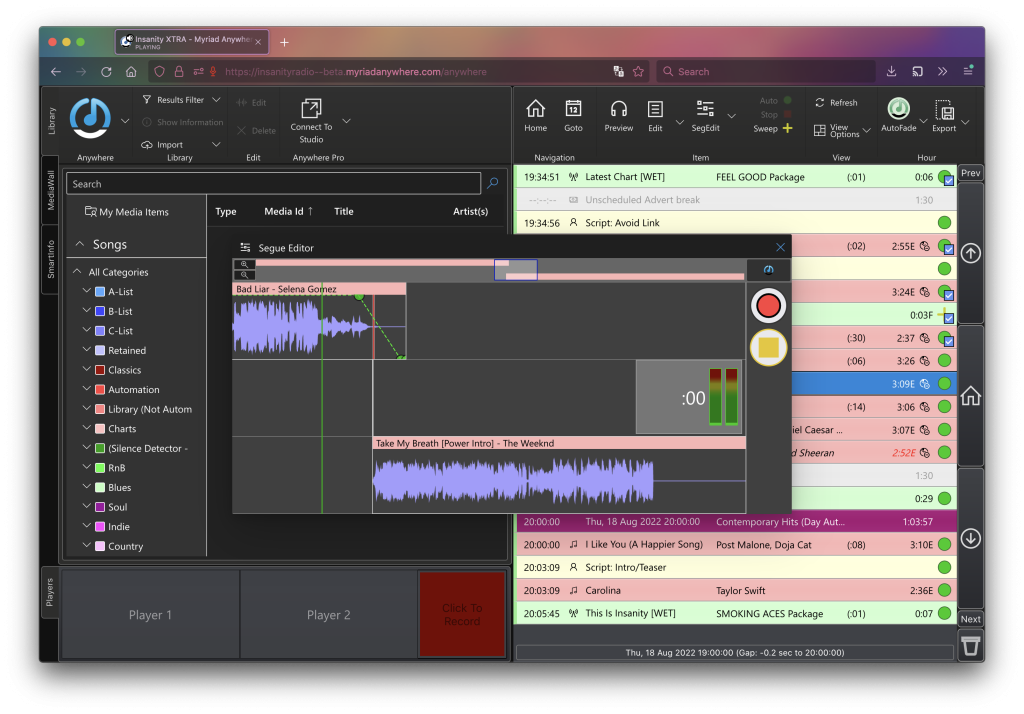
We can also record a voice link to get some practice. To do this, click the microphone button. It will transform into a red dot.
It will automatically start recording when the microphone picks up sound, but it will also start recording when you click the red record button (or press the space bar).
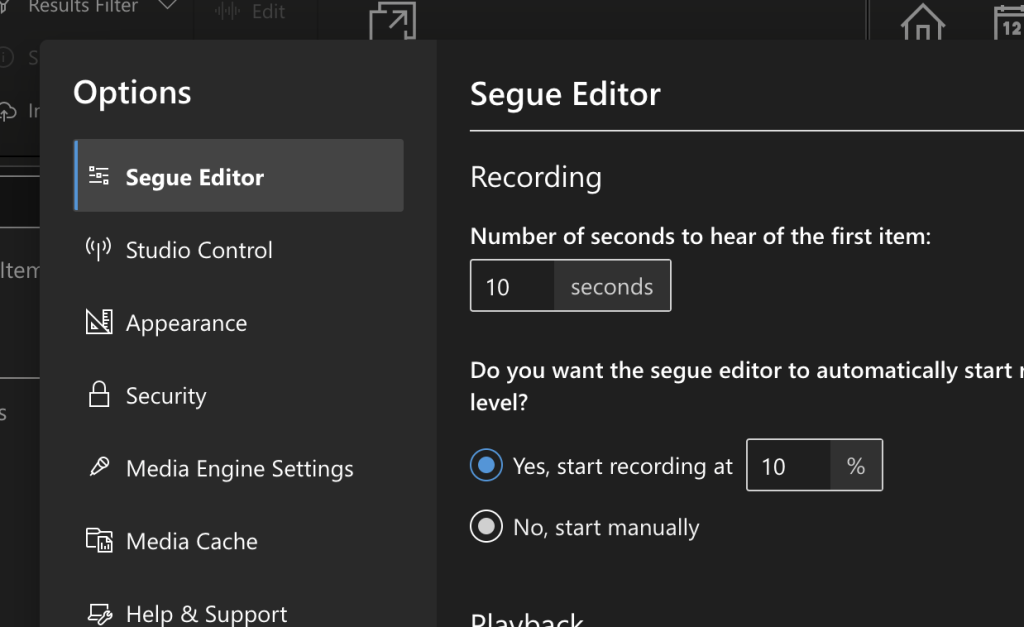
If you’re in a noisy environment it can be a bit over sensitive and start recording too soon. Although this doesn’t really matter, you can go to Options and change the automatically start recording setting
Once you’ve finished saying what you want to, click the fast forward button. This will start the next song – so you could also click the button to talk over the intro. In fact, I’m going to re-record that VL. Once you’re done, click stop. If you’re happy with what you recorded, click the tick button. To delete it (warning: permanently!) click the cross.
Once you’ve hit save, you’ll see it appear in the log.
Recording For Real
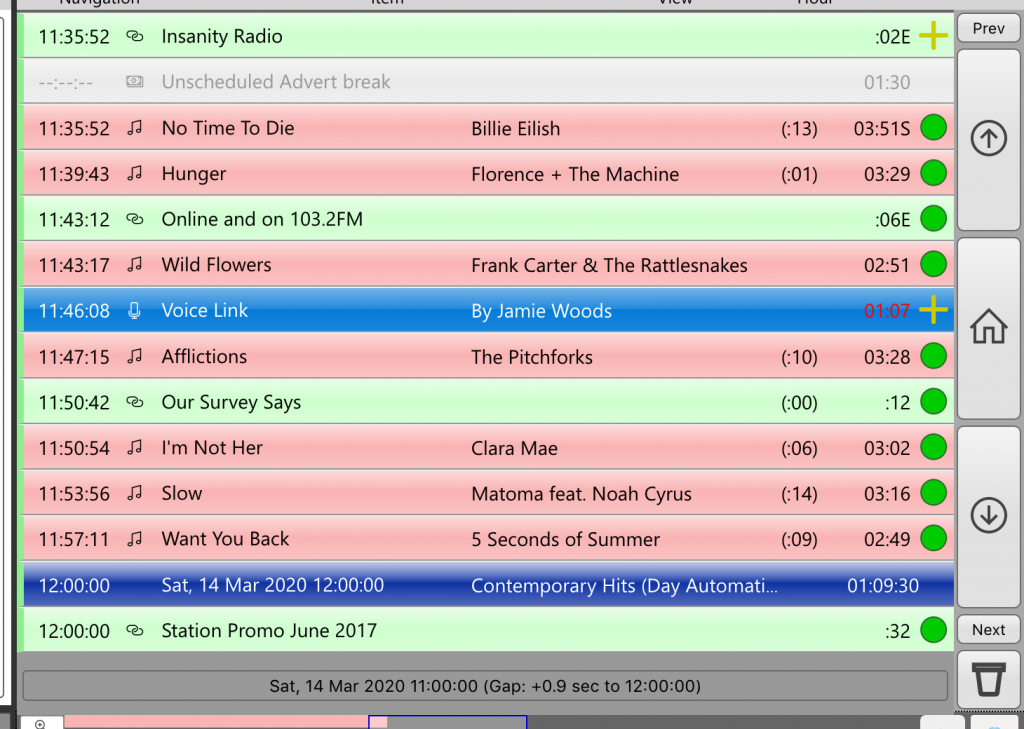
Make sure you’ve opened “Insanity Radio” as a station (click the blue menu button if you’re not sure). If you don’t open the main Insanity station, your recordings will never make it to air.
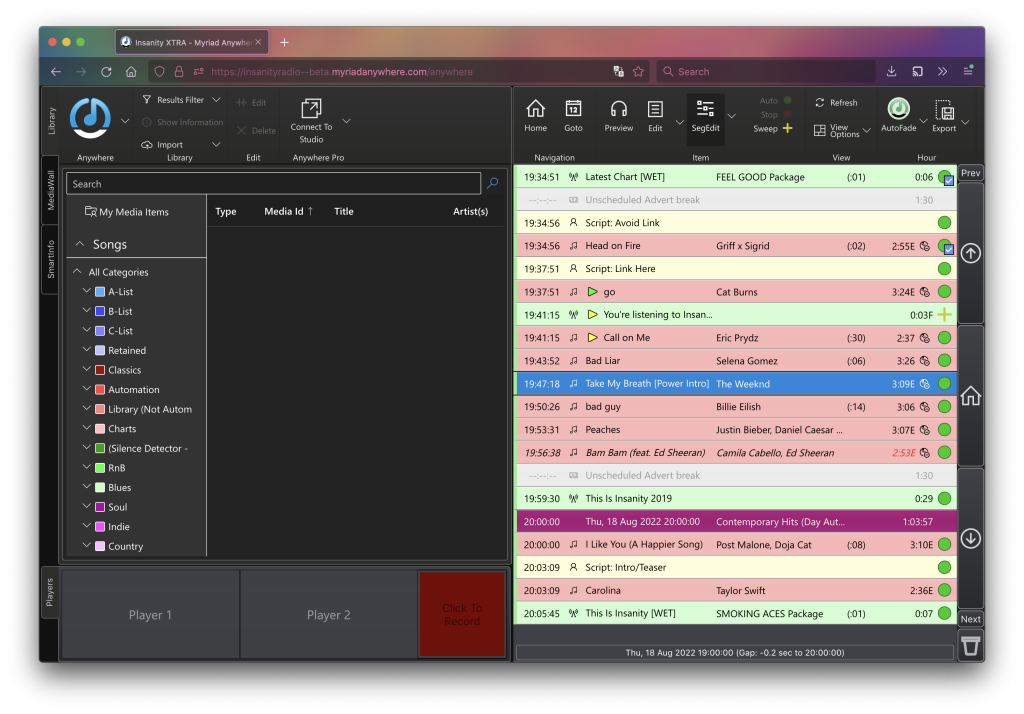
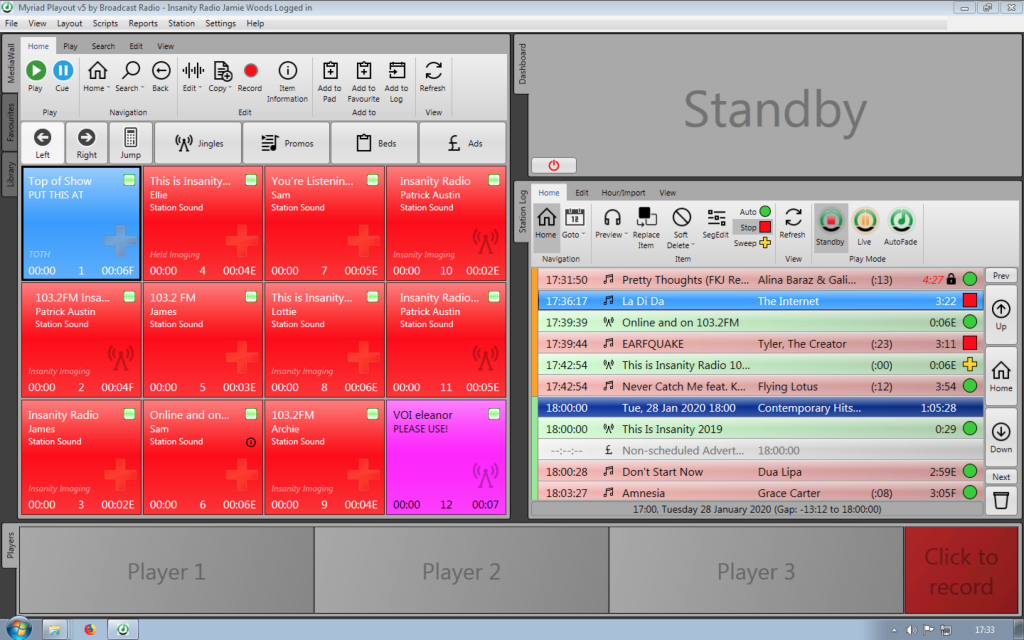
Let’s log our show. Exactly as we would on Myriad, click “Goto” and enter the date/time of our show. Unless you want to keep them, delete all the existing songs out of the hour by dragging them into the bin or pressing delete. Log your songs like normal, but make sure to leave the hour in AutoFade.
If we put the hour in Live, we may inadvertently add stops into the log or mess up the timings for the next show. Remember that leaving stops during pre-records can cause radio silence so please avoid putting red squares/stops in.
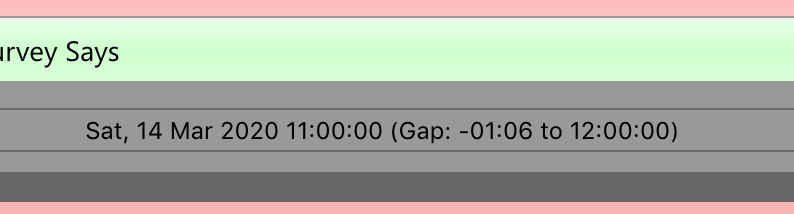
Remember that the gap timer will tell you if your show is too short or too long (ie. overrun/underrun).
Right now, we can see a gap of “-01:06”, which means we have space to record 1 minutes and 6 seconds of links this hour. As it’s hard to time your recordings perfectly, it’s better for the gap to be positive (aka “+XX:XX”) than negative, as then the system can trim the songs to make the show run to time.
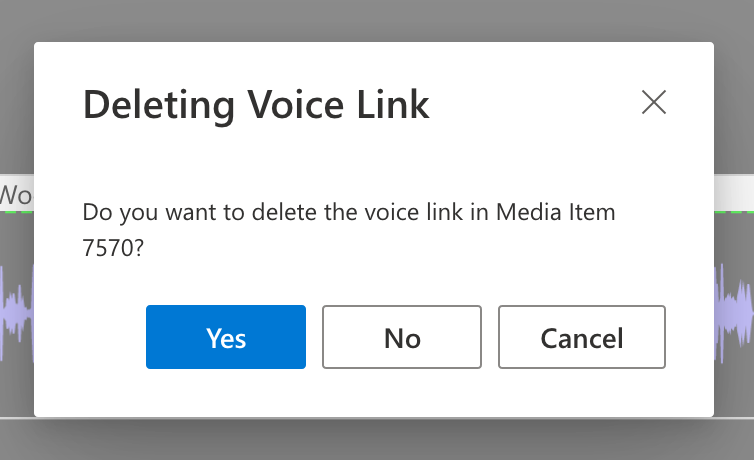
Once you’ve recorded a voice link, it’s good to go. However, if you wish to delete it, click the back arrow on the top bar in SegEdit.
The system will give you the option to keep or delete the recording. If you want to keep the recording (maybe for future editing/use if it was a good one otherwise) click No.
And that’s basically it! You’ll hear your own voice on the radio when you’re miles away from the studio, how proper weird.
If you’re only used to uploading music through Nerve, and want to play something else like a vox-pop, interview, or pre-record, here’s the guide to getting it onto the system.
Do not import songs this way!
Log into Myriad as yourself! If it’s already logged in, go to File, Logout, then enter your username and password.
Myriad logged in as a person
Click MediaWall, and click “Jump”. Enter 100,000 in the box, and click Ok.
Scroll using the Left/Right buttons, until you find an empty place
Drag your MP3, WAV or whatever into this place. It will import it and get it ready for airplay.
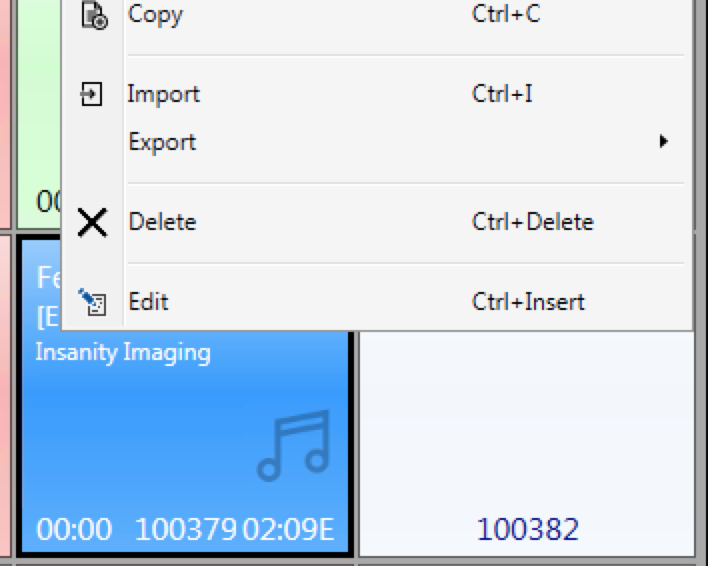
It’s imported, but now you need to fill in the metadata! So right click and hit Edit.
Click Save, and drag this into the log like you would any other item!
Here’s some advice from previous station winners on how to make demos, and write accompanying content.
You may find this useful when applying for industry-jobs, or when entering the Student Radio Awards. If you’re entering awards, I’ve added some extras to some bullet points to try and make things easier for you.
Be yourself.
The judges can tell if you’re trying to be similar to a personality.
Put your best link first. Your first link needs to be short, and should be your best one. First impressions really count. The more confident you sound, the better. (Okay, perhaps they don’t need to be crazy short if there’s a good reason)
If you’re applying for an entertainment category (or an entertainment-y station like Radio 1) put something bloody hilarious. If you can make the judge laugh, you’ve got a damn good chance of winning.
If you’re applying for a specialist category, open with a really interesting fact that shows you know and love your music.
If you’re applying for a speech category, start with some engaging and thought-provoking content.
If you’re applying for best male or best female, stick to the advice above based on whatever you’d categorise your show as.
Create a different demo for each station you’re sending it to.
Not all stations sound the same. Radio 1 want different-sounding presenters to Heart, and Radio 4 wants very different presenters from Capital. If you’re sending your demo into different stations for consideration, you should really bear this in mind, otherwise the person listening to it will likely throw it out.
Listen to the station you’re sending your demo to, and get a feel for exactly what that station’s vibe is (this is important even with local radio).
Don’t be afraid to be creative!
Done something that hasn’t been done on radio before? Judges love that. Again, it’s all about being you. Be yourself.
Be selfish.
If you’re submitting an entry to an individual category, and you have a co-host, try to keep their voice out of the demo where possible. The occasional line is fine, sure, but it’s your demo. You can include them in a show-specific category, of course!
No seriously, be yourself.
Are you seeing how important this is yet?
Pre-record a show. Cheeky plug here.
But seriously, if you pre-record content, you can keep trying to record a line or anecdote until it sounds perfect. All demo content for the awards need to be something you’ve aired, so you can’t just sit in front of a mic and make a demo.
Bear in mind that it’s very easy to confuse “perfect” with something that doesn’t have hiccups but sounds very unnatural. Don’t go overboard on re-recording.
Listen to your final demo in full
After you’ve finished editing, sit down with a clear head and listen through your demo. Be as self-critical as possible, as you really want your demo to sound as close to perfect as possible.
Make the markers between different links clear.
Use a transformer/electronic sound effect to separate links. The rules technically require this. You can get some here.
Proof-read your write-up.
Got to submit a written entry? Make sure it’s proofread. Get someone else to proof read it, to make sure that it’s sound and tiiight. Don’t ramble. Treat it like an essay if that helps.
Ask for help!
Send your demo to someone else to get it listened to. If you have a producer, email them first. I’ll (Jamie Woods) be really happy to listen to your demo and give you some strong feedback. I’ll also try and share it with my professional contacts. I can’t stress how important it is to get people to listen to your demo.
Sharing visual content from your show? Here are some creator 101 tips for YouTube and other video platforms.
If possible, ask the Head of Visual Content (e: visual@insanity) to upload the content directly onto our YouTube channels.
This really depends on your target audience, but if you’re an entertainment show trying to #SocialGoals, this is a great place to start.
1. Short & Sweet
For visual radio, long-form video doesn’t work best. Remember the “one thought one link” rule from entertainment radio – apply that to videos if you want to target .
For instance, if you have a live act performing a set of songs, make sure each song has its own video. It’s fine to have ten or twenty seconds of dialogue at the start and end, as this helps give context.
2. Copyright Check
Cut out all music! Be wary if you’ve used a bed – if it’s a well known song instead of an Insanity specific bed, it may get flagged.
YouTube has a PRS license, which means they pay for song covers (great for live music!) Facebook does too, as of February – covering all their platforms such as Instagram, Messenger.
3. Look & Feel
Make sure you “top and tail” your videos, so they’re instantly recognisable as ours. The top contains our “sonic logo” (as well as logo), so people immediately know what they’re watching is an Insanity production.
The “tail” lets us suggest videos to viewers in the last 5-10 or so seconds of a YouTube video.
If you’re not sure how to do this, you can send your unedited video to the Head of Visual, but they won’t be able to get it published as a priority.
4. Sharing
Videos should, where possible, be uploaded to Insanity’s social media channels. From there, you can share them on your own pages. Due to how Facebook and Twitter’s algorithms work, people are more likely to see your videos this way.
People are more likely to watch videos on Facebook if they’re uploaded as a Facebook video. Opening another app is a pain, and you lose out on autoplay.
Our Facebook videos get thousands of views.
Don’t share music/covers on Twitter, as this is illegal because they currently have no licensing agreement.
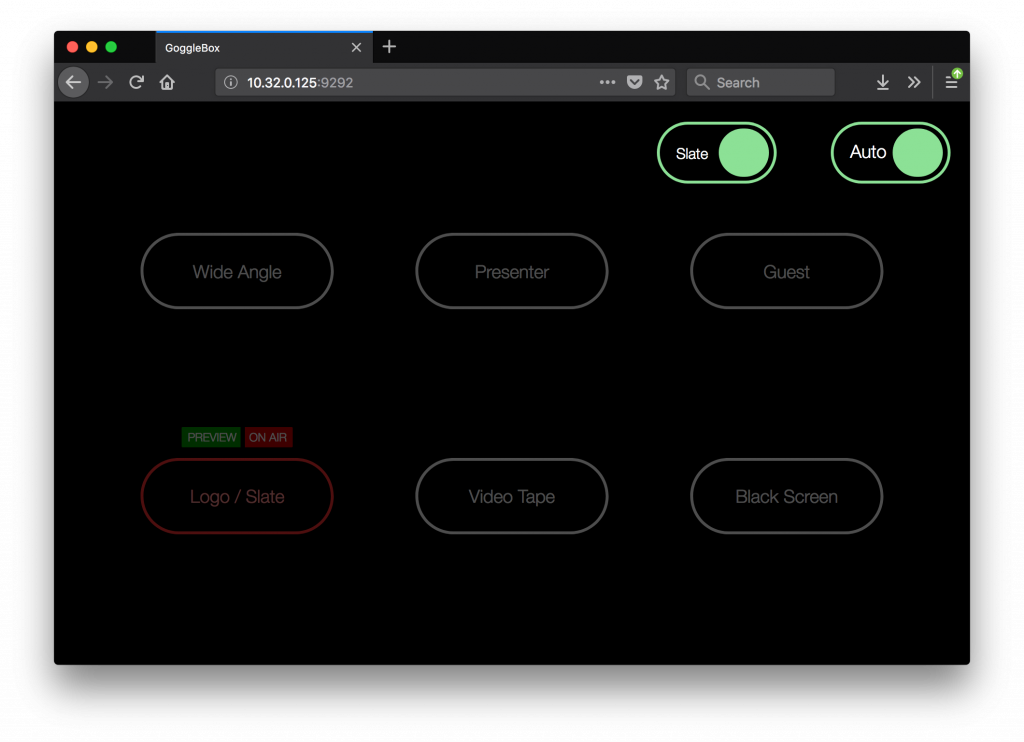
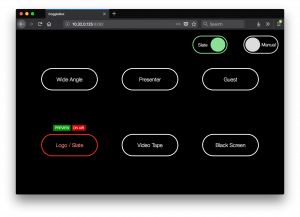
If you’re doing a planned visualised segment, chances are you’ll want to manually control which cameras are live. This is called vision mixing.
Insanity uses a bit of kit it built called automix to control the cameras, but you can manually override it. To do that, open a web browser, and go to http://10.32.0.125:9292 . This can only be done from an Insanity network connected PC (so any one in the office or studios).
This’ll show you a page somewhat like this.
automix remote control – GoggleBox.
When you close the GoggleBox web-page, the camera settings will revert back to default.
In the above screenshot, the cameras are in Auto mode.
None of what we can adjust on this page affects sound.
Turning Off the Slate
The slate is the “holding picture” (currently a vinyl with the classic Insanity headphones) used when the cameras and microphones aren’t live. If we want to override this so that the cameras are always live, we can click the toggle button labelled “Slate”, which will change to “Wide”. In the “Wide” mode, the wide angle camera will always be live when the microphones are off.
Manually Selecting Cameras
Click the “Auto” toggle button. It will slide to “Manual”, and change colour to grey. The other buttons will become visible again, and you can click them.
To change which camera/input is live, double click/tap it. The first click will put the camera into preview mode (this is important for technical reasons), and the second click will make it live. The live camera will not change unless you either shut GoggleBox, change the mode back to Auto, or click another camera.
Working on a podcast, video, or some on-air segment that’s pre-recorded? Here are a list of things you should always check off before airing and/or uploading a clip.
This assumes you have a relatively basic understanding of audio. If not, there are some brilliant tutorials out there – we’ll be writing some of our own guides soon!
Pre-production check-list:
Your microphone is close to the source. But not too close – nobody should be making out with the mic. 10-20cm is a good distance.
If this isn’t particularly easy to achieve, have a listen before you record. If you don’t, it’s almost impossible to remove them in post. So plug in a pair of headphones, and ensure:
The target isn’t drowned out by the background noise. If you can’t check, go somewhere quiet.
The target isn’t echo-ey (the bathroom effect). Is their speech nice and clear?
If any of the above are true, move the microphone closer.
Ensure that you’ve got enough microphones. Try and get the Zoom, not the Tascam, as this lets you plug in more mics. Make sure:
You have a different microphone for everyone talking. For instance, your interviewee has a handheld (with better quality), and you have the portable recorder OR
You have the one microphone closest to your interviewee. You can always re-record your questions later on, but obviously not theirs.
If outside, you have a windshield on your microphones to prevent that yuck whooshing sound.
Check the levels before you record.
When your guests speak, the level ideally shouldn’t go above 75% on the VU (volume unit) meter.
It shouldn’t be normally below 40%, as for technical digital recording reasons your quality becomes lower & noisier.
Record phone calls using the unit in the studio, not off a mobile phone. Cell tower quality is really poor.
If you’re shooting video:
Avoid using just the shotgun microphone on your camera. The audio from these is almost always unusable. Give your presenter a handheld, use a clip-on/wireless mic, or find a boom operator.
If covering an event, ask the organisers ahead of time if they can provide you with an audio feed. The Union are usually willing to do this. You can probably plug the XLR directly into your camera.
Once you have the audio back in the edit suite, import it into Audacity and split all the tracks into mono. This’ll make mixing easier.
Post-production checklist:
The overall levels are OK. The volume shouldn’t go between loud and quiet across different segments. You can apply some compression to achieve this, or use Audiomatic on your final mix to master the audio.
Speech isn’t panned to the left or right. Put on a pair of headphones – if one of your ears receives special treatment, ensure the audio tracks are split to mono.
The average volume of your clip, in Audacity, sits at about 80% height on the blue wave form (or, when you play it, doesn’t go above -4 on the green meters). Try to avoid red vertical lines, as these represent clipping (which your audience can hear as distortion).
You can fix some of these issues using Audiomatic – an internal tool we built specifically to help you do this with minimal effort. If you’re not an Insanity member, you can achieve a similar effect using Stereo Tool and the Syrtho preset – our tool is just a shortcut for this.
In this post, we’ll explain how to syndicate a show (such as the Student Radio Chart Show)
You will need:
The raw streaming URL for the server in question. It might look like one of these, but could be anything
http://0.0.0.0:8000/stream
http://0.0.0.0/;
http://stream.bbc.com/listen.mp3
Access to the main studio
This implies the show starts at 2PM. Adjust accordingly.
Open VLC from the start menu
Go to File, Open Network.
Enter the streaming URL from above
Press “Play”
Pre-fade listen OB1 on the mixing desk to see if there is signal. If not, check Stereo Tool is running. Open its window, and see if there are any green signal bars showing up on the monitor.
If there is signal, use the green knob on the mixer to adjust the volume. It should peak at around 5, and never exceed six.
On Myriad, set the current (1PM) hour to Auto Fade, so that it finishes exactly on the top of the hour (i.e. at 14:00:00), instead of early or late.
On Myriad, empty the log hour (2PM) completely, except for the green Top Of Show. Empty any following hours (3PM) completely, including the green Top Of Show.
Make all hour(s) (2-3PM) Live Assist.
After this log item, add the “SRA Chart Show” purple marker. (It will show up green in the log, this is normal!) This is on the second page of the Audio Wall sweepers page.
Set this to a stop.
Once you reach the SRA Chart Show, and the stop, turn on and fade up OB1.
At the end of the show, fade down OB1 and hit “Go”, like you would finishing any other link.
All music used in broadcast needs to come through the right channels. If it doesn’t, then the broadcaster risks getting in huge trouble. Obviously, we pay for all our music. Scary bits aside, let’s discuss how to source high quality music for your show.
Prerequisite: Music Quality
Music comes in all shapes and sizes. You’ve probably head of MP3 and WAV. There are other formats such as M4A, AAC, and FLAC that we use in broadcast. This will explain what all of that means. If you don’t care, you can skip over it. It’s useful to know, though.
You’ve probably noticed that MP3 files are waaaaay smaller than WAVs. This is because they apply clever tricks to remove bits of audio that humans aren’t likely to hear. As a result, this lowers the sound quality – known as “lossy/compression”. There are different intensities of compression that result in different “bit rates”. These are the ones for MP3:
128kbps is regarded as transparent (i.e. unnoticable) to (very very roughly) about 50% of people. But that’s not good enough for broadcast. This is about the top quality of YouTube.
192kbps is regarded as transparent to about 70% of people. Still not good enough for broadcast.
256kbps and above are transparent to 99% of people, which is probably acceptable.
In modern M4A/AAC, anything above 192kbps is probably okay to use in broadcast.
If you’re thinking “why can’t I just increase the bit rate?” – you sadly can’t. If you’ve ever tried to make a small digital photo bigger, you’ve probably found it’s impossible. It’s the same concept with audio. Sadly, some online stores try to fake the bit rate and then pretend it’s higher when in fact it isn’t.
We can’t use tracks that aren’t above 256kbps or similar. This is because the station uses clever processing techniques to make our output sound better, but this does not work well with low bit rate MP3s (i.e. 192kbps or below). You really can hear it, and it sounds very unprofessional.
WAVs and FLACs are large files, but they keep all of the sound quality.
Nerve will do most of the hard work here in determining if a song is of good enough quality. If it isn’t, it’ll reject it. Before Nerve, this was not possible.
Promos
A lot of our music actually comes from record labels. The Head of Music receives lots of emails with links to tracks. If it’s relatively mainstream, chances our you can ask them very nicely to see if they have it.
You can also approach a record label directly. As this blog is public, I can’t share our contacts, but our Head of Music will again be happy to assist! Often, you can find a bands publicist through Google.
This store is designed for broadcasters. Registering an account is free. The best bit about this store is that downloads are significantly cheaper than iTunes and Amazon. It is done on a credits system, so purchasing 50 credits will get you 50 songs at 63p a track. There’s no minimum, but bulk credits give bulk discounts.
When selecting a .WAV, you’ll need to enter/search for the track in Nerve. This is because WAVs don’t include computer readable song info, unlike most MP3s.
iTunes
The iTunes store lets you download tracks at 99p a pop. Don’t forget that this is separate to Apple Music, which is a streaming service not a downloads service.
You can select the M4As from your “iTunes” music folder and upload them directly to Nerve.
Amazon
Amazon will give you an MP3 download of a track for 99p. However, disappointingly in some cases, the actual quality of the download can be very low. Just search for a song on Amazon and buy it like any other track.
CDs
Shop around in second hand stores like CEX, buy new, or raid your parents’ vast CD collection. You can then rip them (DON’T use Windows Media Player, use “fr:eac” with WAV or FLAC as described here) and upload them to Nerve.
If you’re pre-recording a show you may occasionally come across a really weird bug where music will sit outside an hour.
Not to worry, there’s an easy(ish) way to get around it, it just involves digging into menus a bit more than you may be used to.
First, delete the dodgy hour. Right click on the hour’s purple markers and press Delete. It will panic and say “Do you REALLY actually want to delete this? Please no”. Ignore its pleas and continue clicking Yes.
Next, go to Log, Add Hour To Log. Under there, click Add Hour from Carts
This will open the normal “Select Date” dialogue. Enter the hour at the start of your pre-record, select the right date and press ok. You will have to do this again later for the second hour.
Next, it will pop up with a really odd looking Audio Wall browser. This is more or less a list of what you see on the left hand monitor.
Double click “1”, or Top Of Show (in orange), to select it.
Great. Now, just type “1” into the next dialogue (not 10, otherwise it will insert 10 sweepers in a boring order), and press ok.
That’s it! In the log you should now have an hour starting with the TOP OF SHOW sweeper, just like when you normally plan a show. You will have to do it again to add your next hour of music, but just leave the other hours non-existent so that they can be filled later on with playlist music.
Be sure to change the hour mode to Auto, not LiveAssist or AutoFade. And don’t put stops (red squares) anywhere in your pre-rec.