Yearly Archives

5 Articles

Production

Playing Out Syndication: Student Radio Chart

Posted by Jamie Woods on

In this post, we’ll explain how to syndicate a show (such as the Student Radio Chart Show)

You will need:

  • The raw streaming URL for the server in question. It might look like one of these, but could be anything
    • http://0.0.0.0:8000/stream
    • http://0.0.0.0/;
    • http://stream.bbc.com/listen.mp3
  • Access to the main studio

This implies the show starts at 2PM. Adjust accordingly.

  1. Open VLC from the start menu
  2. Go to File, Open Network.
  3. Enter the streaming URL from above
  4. Press “Play”
  5. Pre-fade listen OB1 on the mixing desk to see if there is signal. If not, check Stereo Tool is running. Open its window, and see if there are any green signal bars showing up on the monitor.
  6. If there is signal, use the green knob on the mixer to adjust the volume. It should peak at around 5, and never exceed six.
  7. On Myriad, set the current (1PM) hour to Auto Fade, so that it finishes exactly on the top of the hour (i.e. at 14:00:00), instead of early or late.
  8. On Myriad, empty the log hour (2PM) completely, except for the green Top Of Show. Empty any following hours (3PM) completely, including the green Top Of Show.
  9. Make all hour(s) (2-3PM) Live Assist.
  10. After this log item, add the “SRA Chart Show” purple marker. (It will show up green in the log, this is normal!) This is on the second page of the Audio Wall sweepers page.
  11. Set this to a stop.
  12. Once you reach the SRA Chart Show, and the stop, turn on and fade up OB1.

At the end of the show, fade down OB1 and hit “Go”, like you would finishing any other link.


Uncategorized

Tips for Sourcing Music

Posted by Jamie Woods on

All music used in broadcast needs to come through the right channels. If it doesn’t, then the broadcaster risks getting in huge trouble. Obviously, we pay for all our music. Scary bits aside, let’s discuss how to source high quality music for your show.

Prerequisite: Music Quality

Music comes in all shapes and sizes. You’ve probably head of MP3 and WAV. There are other formats such as M4A, AAC, and FLAC that we use in broadcast. This will explain what all of that means. If you don’t care, you can skip over it. It’s useful to know, though.

You’ve probably noticed that MP3 files are waaaaay smaller than WAVs. This is because they apply clever tricks to remove bits of audio that humans aren’t likely to hear. As a result, this lowers the sound quality – known as “lossy/compression”. There are different intensities of compression that result in different “bit rates”. These are the ones for MP3:

128kbps is regarded as transparent (i.e. unnoticable) to (very very roughly) about 50% of people. But that’s not good enough for broadcast. This is about the top quality of YouTube.

192kbps is regarded as transparent to about 70% of people. Still not good enough for broadcast.

256kbps and above are transparent to 99% of people, which is probably acceptable.

In modern M4A/AAC, anything above 192kbps is probably okay to use in broadcast.

If you’re thinking “why can’t I just increase the bit rate?” – you sadly can’t. If you’ve ever tried to make a small digital photo bigger, you’ve probably found it’s impossible. It’s the same concept with audio. Sadly, some online stores try to fake the bit rate and then pretend it’s higher when in fact it isn’t.

We can’t use tracks that aren’t above 256kbps or similar. This is because the station uses clever processing techniques to make our output sound better, but this does not work well with low bit rate MP3s (i.e. 192kbps or below). You really can hear it, and it sounds very unprofessional.

WAVs and FLACs are large files, but they keep all of the sound quality.

Nerve will do most of the hard work here in determining if a song is of good enough quality. If it isn’t, it’ll reject it. Before Nerve, this was not possible.

Promos

A lot of our music actually comes from record labels. The Head of Music receives lots of emails with links to tracks. If it’s relatively mainstream, chances our you can ask them very nicely to see if they have it.

You can also approach a record label directly. As this blog is public, I can’t share our contacts, but our Head of Music will again be happy to assist! Often, you can find a bands publicist through Google.

Online Stores

I Like Music

This store is designed for broadcasters. Registering an account is free. The best bit about this store is that downloads are significantly cheaper than iTunes and Amazon. It is done on a credits system, so purchasing 50 credits will get you 50 songs at 63p a track. There’s no minimum, but bulk credits give bulk discounts.

When selecting a .WAV, you’ll need to enter/search for the track in Nerve. This is because WAVs don’t include computer readable song info, unlike most MP3s.

iTunes

The iTunes store lets you download tracks at 99p a pop. Don’t forget that this is separate to Apple Music, which is a streaming service not a downloads service.

You can select the M4As from your “iTunes” music folder and upload them directly to Nerve.

Amazon

Amazon will give you an MP3 download of a track for 99p. However, disappointingly in some cases, the actual quality of the download can be very low. Just search for a song on Amazon and buy it like any other track.

CDs

Shop around in second hand stores like CEX, buy new, or raid your parents’ vast CD collection. You can then rip them (DON’T use Windows Media Player, use “fr:eac” with WAV or FLAC as described here) and upload them to Nerve.


Have fun, and stay legal!

Presenting

How to use the studio phone

Posted by Beth Carr on

In the studio there is a phone that can be used for interviews and features. This will mainly be on air but there is also a way to pre-record phone interviews if you can find a time to use the main studio outside the schedule. This post will focus on using the phone for on-air, live content. PLEASE NOTE: The phone system is being constantly developed and altered to make it easier to use and these instructions will be updated periodically.

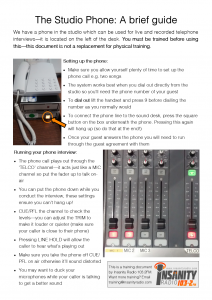
How to use the studio phone

How to use the studio phone – click on the image for a larger version

The full instructions are on the training document on the left – you can save the image for future reference but it is also included here.

Setting up the phone:

  • Make sure you allow yourself plenty of time to set up the phone call e.g. two songs.
  • The system works best when you dial out directly from the studio so you’ll need the phone number of your guest.
  • To dial out lift the handset and press 9 before dialling the number as you normally would. Make sure there is a tone before you dial – if the line is dead your call won’t go through so you may need to put the phone down and press the square button a few times to reset it.
  • To connect the phone line to the sound desk, press the square button on the box underneath the phone. Pressing this again will hang up (so do that at the end!)
  • Once your guest answers the phone you will need to run through the guest agreement with the guest.
  • We don’t accept calls direct to the studio but it dials out on 01784 430005.

Running your phone interview:

  • The phone call plays out through the ‘TELCO’ channel—it acts just like a MIC channel so put the fader up to talk on air.
  • You can put the phone down while you conduct the interview, these settings ensure you can’t hang up!
  • CUE/PFL the channel to check the levels—you can adjust the TRIM to make it louder or quieter (make sure your caller is close to their phone).
  • Pressing LINE HOLD will allow the caller to hear what’s playing out – only do this when you’ve finished talking to them about the interview as they will struggle to hear you!
  • Make sure you take the phone off CUE/PFL on air otherwise it’ll sound distorted.
  • You may want to duck your microphones while your caller is talking to get a better sound.

Other tips:

  • Calls tend to be VERY quiet. Make sure your caller is close to their handset and speaks loudly and clearly. You can turn up the TRIM and also the EQ dials above but make sure these are reset after the call.
  • If you have pre-arranged your interview, send a copy of the Guest On-Air Agreement beforehand so your guest has a chance to understand it – it will also cause less stress with you explaining it before the call.
  • There is a talkback facility that allows you to speak to your guest off-air via MIC 1 without having the handset. This is still in testing and training will be updated when it is less complex. You can still use CUE/PFL to check levels whilst speaking to your guest off-air via the handset, but make sure the handset is kept away from the mic otherwise it will feedback.
Presenting/Production

How to use the portable recorders

Posted by Beth Carr on

One way to get content for your shows is to record clips outside of the studio and we have two recorders that you can use to do that – the Tascam and the Zoom. These are especially useful for members of the News Team and the Music Team but anyone can use them as long as you’ve been trained – you can ask your team leader or the Head of Training for this.

Before you use one of the recorders, you’ll need to request it from a board member and then sign it out on the sign out sheet. Make sure you state the purpose and which recorder you are signing out so we can keep track. You cannot take the recorder home overnight and you are responsible for it whilst it is signed out so look after them and report any damage or technical problems to the board so we can sort them out. Make sure you sign it back in when you return it too!

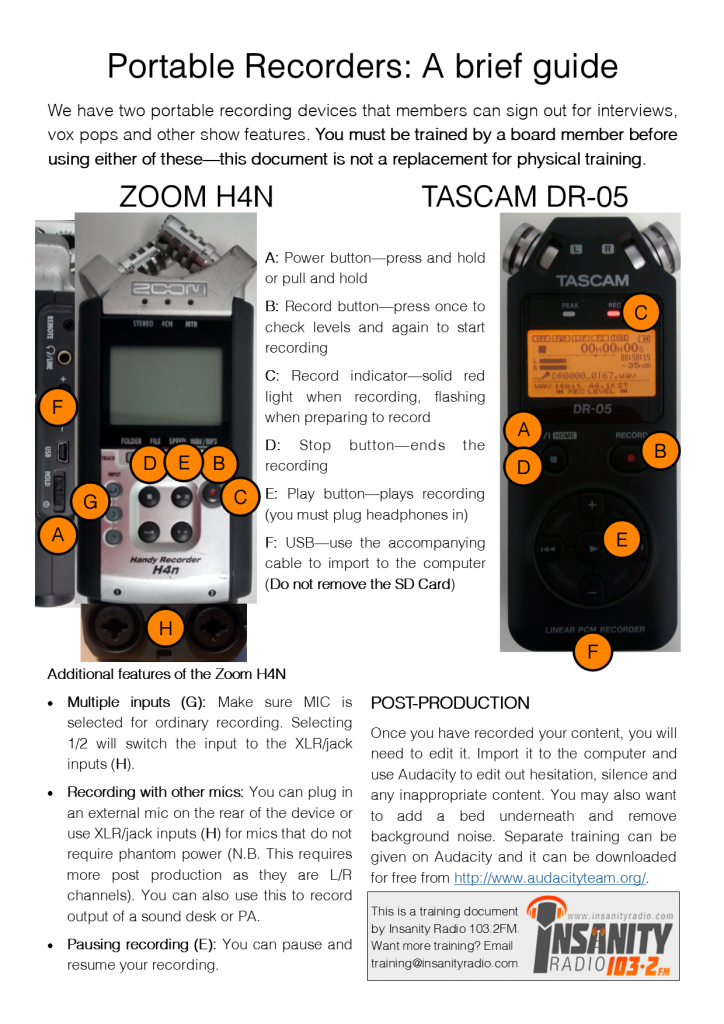
Using the Tascam/Zoom is really easy and the instructions are on the document below – you can click the image for a bigger version and a pdf is available via email!
A guide to Portable Recorders

Nerve

UPLOADING: Extro Points

Posted by Jamie Woods on

When uploading music, it is important that you understand how to use extro points. Using them incorrectly will leave a song sounding horrible on air.

What is an extro point?

It is simply the time in the song where the next song starts to play. If you watch the red countdown on Myriad, zero is the bit of the song you are about to select.

It is also the point where the song will automatically start to fade out over a few seconds. This is because if an extro point is set wrong, it would otherwise lead to a very very horrible overlap.

As you may guess from above, it is very important to pick a good extro point when uploading music. And this will explain how.

How to pick one

To set the “Extro” point, you can either click and drag the little rectangle (it’s portrait and grey) just before where the red starts, or you can click the “Extro” button along the bottom when you have the playback cursor (the black bar that shows where abouts in the song you are) to move the point.

You may notice that Nerve automatically tries to guess one. It’s not very sophisticated, but it tries to predict where the last beat is. If you think it’s wrong, please do move it! You’ll be happy you did later on.

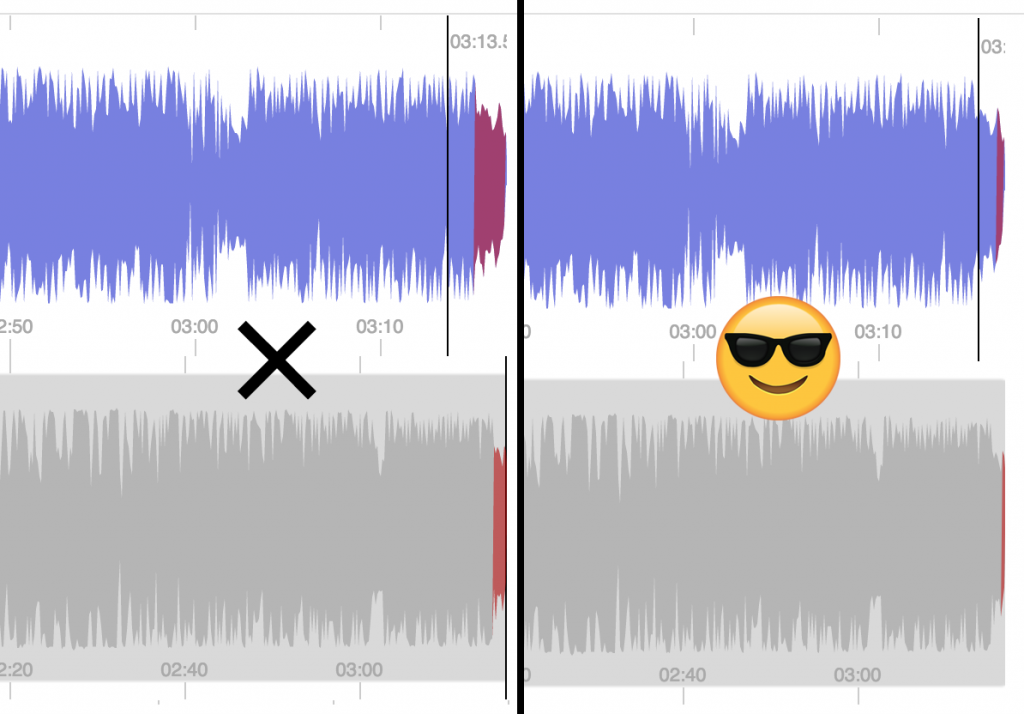
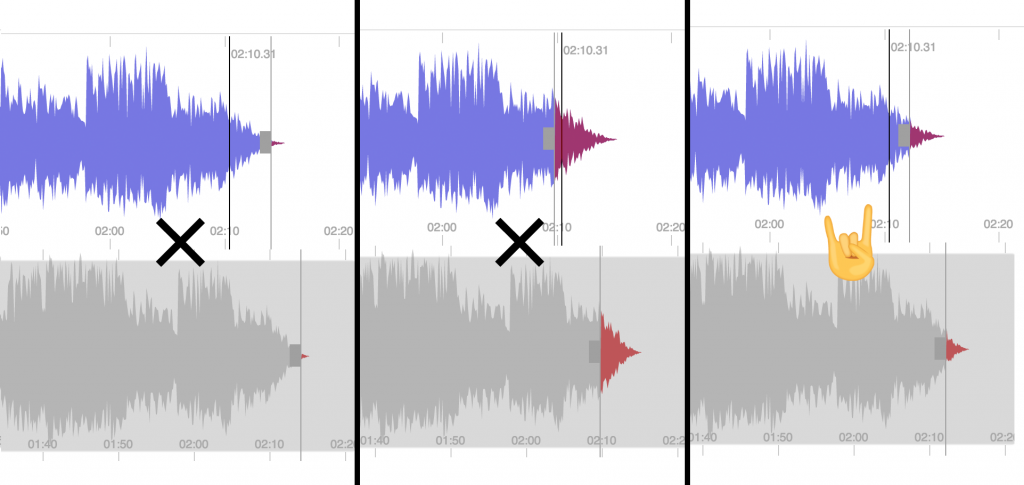
Picking one is rather straightforward, but depends on how it ends. If the song just ends, you should put the extro point on the last beat of the song, just about where the wave starts to end. If you’re confused, check out the below diagrams.

The example on the left isn’t right, as there’s about 3 seconds of the song after the extro marker. The song would then start to fade out and the last beat wouldn’t be very pronounced.

If the song has a Fade or Sustained ending, you should put the extro point about two-thirds of the way into the fade. By design, it will speed up the fade out after that point as the next song is cued. Don’t put it too far left or the ending will sound weird, and don’t put it too far right as there’ll be no graceful segue. See below for another example:


Ta-da!

And finally, a top tip: don’t be afraid to use a Jingle or Sweeper to segue up two songs.