Beth Carr


Presenting/Production

How to use the portable recorders

Posted by Beth Carr on

One way to get content for your shows is to record clips outside of the studio and we have two recorders that you can use to do that – the Tascam and the Zoom. These are especially useful for members of the News Team and the Music Team but anyone can use them as long as you’ve been trained – you can ask your team leader or the Head of Training for this.

Before you use one of the recorders, you’ll need to request it from a board member and then sign it out on the sign out sheet. Make sure you state the purpose and which recorder you are signing out so we can keep track. You cannot take the recorder home overnight and you are responsible for it whilst it is signed out so look after them and report any damage or technical problems to the board so we can sort them out. Make sure you sign it back in when you return it too!

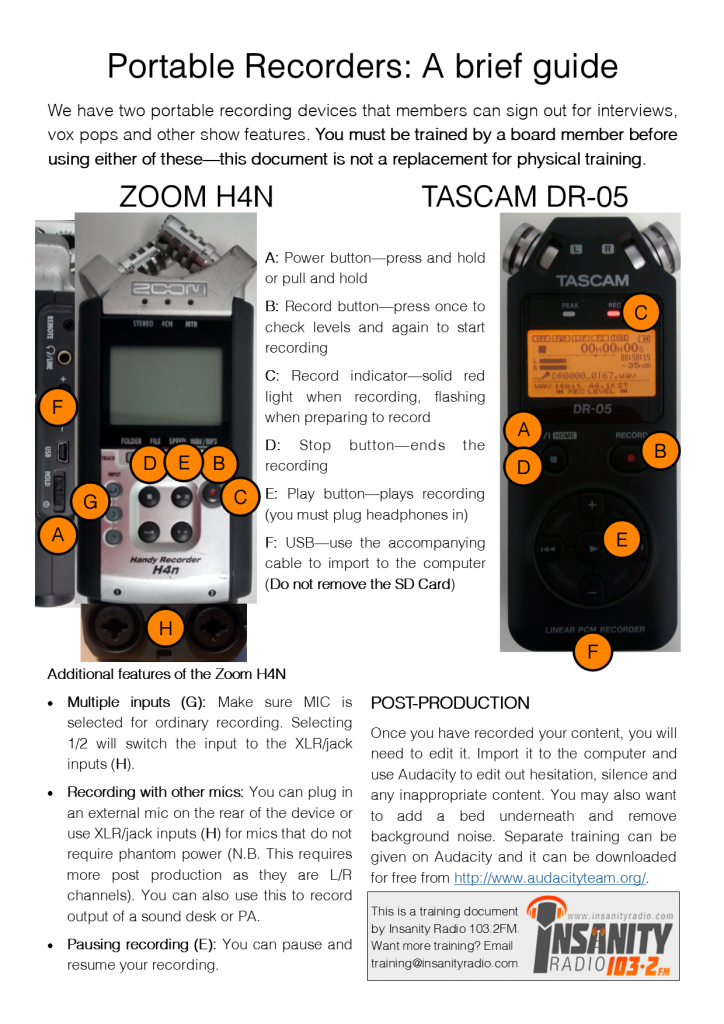
Using the Tascam/Zoom is really easy and the instructions are on the document below – you can click the image for a bigger version and a pdf is available via email!
A guide to Portable Recorders

Myriad/Presenting/Production/Uncategorized

Pre-recording in Studio 2

Posted by Beth Carr on

Pre-recording is nothing to panic about! There are two ways you can pre-record a show – we recommend using the first, SegEdit. Setting up is the same for both methods.

Set Up in Studio 2

  • Before entering the studio, log your music into the time slot when your show will be aired (most pre-records are 2 hours so use two hour long slots) – if an error message appears when you ‘Go To’ your hour, select the ‘Log’ drop down menu on the top left of the screen, then select Add Hour to Log > Add Empty Hour and choose the hour (or two) that you need. You can then drag and drop songs into the hours as usual.

christmas-pre-recording-shows-in-studio-2

  • Sign in to the presenter’s Insanity account on Myriad in studio 2.
  • Make sure all three power switches behind the equipment are turned on in studio 2.
  • Press the ‘AUD’ button above the microphones that are going to be used during the recording – these are the two channels on the far left of the sound desk.
  • ‘Go to’ the hour in the log that your pre recording is scheduled to play on air and make sure it is set to AUTO (it should not be in AutoFade).
  • Press the round ‘PFL’ button above Myriad cart 4 (blue channel, far right of the sound desk). All the Myriad channel faders should be down.
  • On the right of the sound desk are 10 buttons, set out in two columns – press the top two (AUD) but leave all the others.

christmas-pre-recording-shows-in-studio-2-1

1) Using SegEdit: (recommended)

  • Highlight over the song you want to play after your link and open SegEdit (located on the right hand computer screen above the logs).

Pre-recording using SegEdit

  • Press the spacebar to play the end of the track before your link.
  • The recording will start automatically when the microphone picks up sound so make sure you are quiet until you want to start recording. You MUST start the recording before the red line near the end of the track – if you’re not ready to talk, make a noise like a cough or pop to activate the mic (then you can be quiet again). You can see the duration of the recording at the bottom right hand corner of Myriad.
  • Press the spacebar again to start playing the song after the link and then spacebar again to stop the recording.
  • If you are happy with the link then remember to click save!
  • Repeat the spacebar button pressing for all voice links.
  • Once you are finished, right click the top of the hour that contains the time and date and select ‘Export this Hour to a file’ – save it in Computer/Music (M:)/PRE RECORD LOG FILES and save it as ‘Presenter/Show Name Date Time’. Make sure you do this for both hours.
  • Make sure you log out when you are done!

2) Pre-recording into carts: (commonly for interviews or other features)

  • Log into Myriad.
  • Find an empty cart on the AudioWall – 8000-10000 is used for recordings.
  • Right click on the empty cart and select ‘record into cart’. It will automatically start when the microphone picks up audio.
  • Press stop on the bottom right corner of the screen (the recording cart) to end the recording and save it if you are happy.
  • Make a note of the pre-recorded material’s cart number so you can log it with your music in your show.
  • To locate the cart your pre recordings went in to, click ‘Jump’ on the left hand side of the computer screen and type the number of the cart.
  • Edit the name and artist to something more memorable and put the date it will be aired to make sure the cart isn’t accidentally deleted.
  • You can drag your recording into the log as you would with music and use SegEdit to blend it in with the songs.

Beds in Studio 2

  • If you want to add beds to your pre-record, you can do this in studio 2!
  • Choose the bed (or beds) you’d like to use and drag it into cart 1, 2 or 3. Select ‘AUD’ and keep the fader up on the sound desk (these carts are the other three blue channels on the right, next to cart 4).
  • Start playing the bed whilst voice recording (either on SegEdit or into a cart) on the Myriad screen and when you want to talk over it, drag the slider down to between 5 and 10 (it may sound louder on the headphones than it will on air)
  • If you want to talk over an intro to a song, fade out the bed as you would when live and press the spacebar to start the next song on SegEdit.
  • PLEASE NOTE: The ‘ON’ buttons above the Myriad faders do not start tracks as they would in Studio 1 so you have to manually press play for the carts on the screen and then click back onto the SegEdit panel.

Resetting Studio 2

  • Once you are finished with your pre-record, turn off the ‘AUD’ and ‘PFL’ buttons on all the channels you have used.
  • Put the three Myriad channel faders back up and turn off the ‘AUD’ function on the right hand buttons.
  • Log out of Myriad and return the studio to how you found it:

Resetting Studio 2 to broadcast settings

Any problems, email training2.insanityradio.com or ask your producer.

Presenting/Production

Downloading your show

Posted by Beth Carr on

So you’ve come out of the studio, high on adrenaline and keen to come back next week? Or are you wanting to cry and composing an email to Head of Operations saying you never want to see a radio studio ever again? Whichever one of these best describes you, we highly recommend you download and listen back to your show. Why? Here’s a few reasons:

  • If you feel like it went badly, chances are that there was a moment in your show when something happened to throw you off. Being able to reflect on what you said/did can help you avoid the same situation happening again – perhaps you tried to discuss a topic you weren’t confident about or you struggled to turn the mics on.
  • Having a recording of your show means that you can share it with friends and family, who can give you feedback on what they liked and what they’d like to hear more of. These are the core listeners for your show and can help you gain an audience if they genuinely enjoy what they hear.
  • If you had a particularly good show you can use the recording to create a podcast. This can reach more listeners and those who missed out on your live show can catch up.
  • It’s also a good idea to keep a record of bits of your show that you are particularly proud of. There are multiple opportunities to enter awards, both as an individual or as part of the station as a whole, and these often require demos – basically a compilation of your best bits. If radio is something you want to go into as a career then a good demos should hopefully help you to bag your dream job.

So, how do you find the recordings of your show? Good news is that each hour is automatically recorded, so all you have to do is download the individual hour for your show. To do this, you need to visit logs.insanityradio.com – this only works ON CAMPUS but you don’t have to come to the media suite to do it. The page looks a bit like the one below:

logs

Once you’ve found the homepage, you need to select the day of your show – this is in the format YYYY-MM-DD. This will send you to the page below:

logs2

You then need to find the file for your show – each one is in the format YYYY-MM-DD-TT.mp3 (T meaning time). As shown above, the time in the file name is the start of your show and the time printed at the end is the end time, with the files saved in hour long slots. If your show is two hours long, make sure you save both files! To actually save it, right click on the blue hyperlink and select ‘Save Link As’ or ‘Save Target As’ (depending on your browser) – this will allow you to save the file to your USB stick or directly to the computer.

There will be more training material on podcasting, demos and how you can use your logs later in the term but for the mean time enjoy listening to your shows on the logs!