Yearly Archives

4 Articles

Uncategorized

YouTube Top Tips

Posted by Jamie Woods on

Sharing visual content from your show? Here are some creator 101 tips for YouTube and other video platforms.

If possible, ask the Head of Visual Content (e: visual@insanity) to upload the content directly onto our YouTube channels.

This really depends on your target audience, but if you’re an entertainment show trying to #SocialGoals, this is a great place to start.

1. Short & Sweet

For visual radio, long-form video doesn’t work best. Remember the “one thought one link” rule from entertainment radio – apply that to videos if you want to target .

For instance, if you have a live act performing a set of songs, make sure each song has its own video. It’s fine to have ten or twenty seconds of dialogue at the start and end, as this helps give context.

2. Copyright Check

Cut out all music! Be wary if you’ve used a bed – if it’s a well known song instead of an Insanity specific bed, it may get flagged.

YouTube has a PRS license, which means they pay for song covers (great for live music!) Facebook does too, as of February – covering all their platforms such as Instagram, Messenger.

3. Look & Feel

Make sure you “top and tail” your videos, so they’re instantly recognisable as ours. The top contains our “sonic logo” (as well as logo), so people immediately know what they’re watching is an Insanity production.

The “tail” lets us suggest videos to viewers in the last 5-10 or so seconds of a YouTube video.

If you’re not sure how to do this, you can send your unedited video to the Head of Visual, but they won’t be able to get it published as a priority.

4. Sharing

Videos should, where possible, be uploaded to Insanity’s social media channels. From there, you can share them on your own pages. Due to how Facebook and Twitter’s algorithms work, people are more likely to see your videos this way.

People are more likely to watch videos on Facebook if they’re uploaded as a Facebook video. Opening another app is a pain, and you lose out on autoplay.

Our Facebook videos get thousands of views.

Don’t share music/covers on Twitter, as this is illegal because they currently have no licensing agreement.

Uncategorized

Manual Vision Mixing

Posted by Jamie Woods on

If you’re doing a planned visualised segment, chances are you’ll want to manually control which cameras are live. This is called vision mixing.

Insanity uses a bit of kit it built called automix to control the cameras, but you can manually override it. To do that, open a web browser, and go to http://10.32.0.125:9292 . This can only be done from an Insanity network connected PC (so any one in the office or studios).

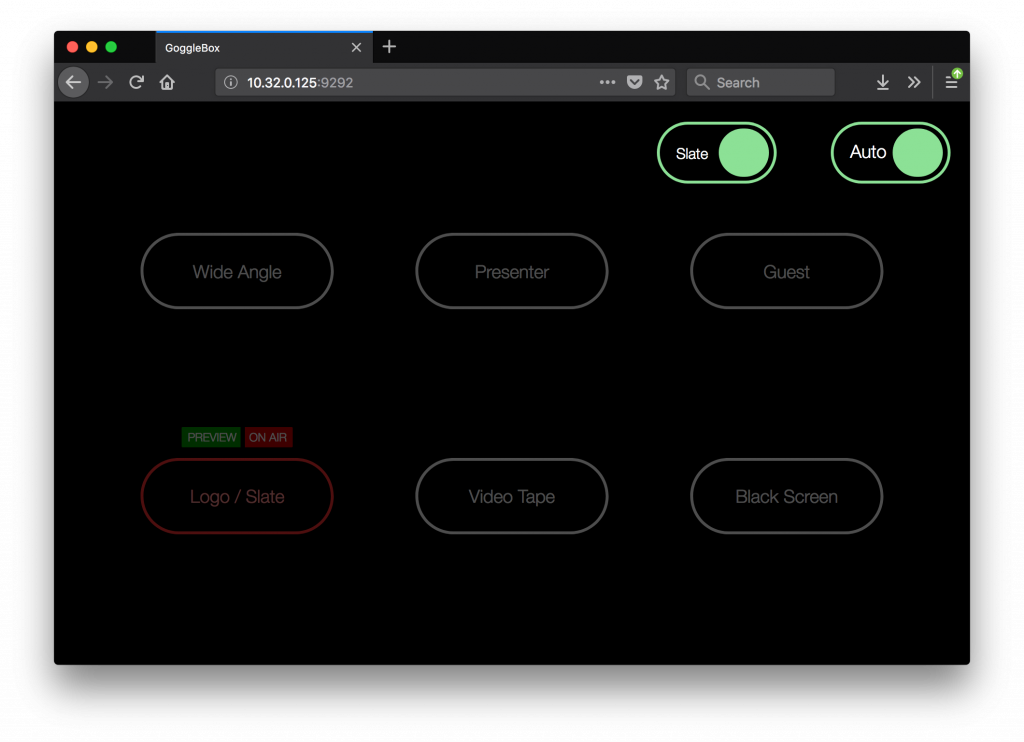
This’ll show you a page somewhat like this.

automix remote control – GoggleBox.

When you close the GoggleBox web-page, the camera settings will revert back to default.

In the above screenshot, the cameras are in Auto mode.

None of what we can adjust on this page affects sound.

Turning Off the Slate

The slate is the “holding picture” (currently a vinyl with the classic Insanity headphones) used when the cameras and microphones aren’t live. If we want to override this so that the cameras are always live, we can click the toggle button labelled “Slate”, which will change to “Wide”. In the “Wide” mode, the wide angle camera will always be live when the microphones are off.

Manually Selecting Cameras

Click the “Auto” toggle button. It will slide to “Manual”, and change colour to grey. The other buttons will become visible again, and you can click them.

To change which camera/input is live, double click/tap it. The first click will put the camera into preview mode (this is important for technical reasons), and the second click will make it live. The live camera will not change unless you either shut GoggleBox, change the mode back to Auto, or click another camera.


Presenting/Production/Uncategorized

Downloading Visual Content

Posted by Madeline Breed on

Downloading visual content is actually pretty easy, plus you’ve then got it forever to make your demos extra special!!

1) Type in 10.32.0.126:9292 to a search bar one one of the insanity computers. These are the only computers it will work from.
2) Fill in the start time
3) Fill in the end time (No longer than a 30 minute period as it can crash the server)
5) Click download mp4
6) Should open up a new tab and will take a few minutes to load, varying on how long the download is
7) It will then download the video file which can be found in the downloads folder


Uncategorized

Audio Checklist – Gettin’ It Right Every Time

Posted by Jamie Woods on

Working on a podcast, video, or some on-air segment that’s pre-recorded? Here are a list of things you should always check off before airing and/or uploading a clip.

This assumes you have a relatively basic understanding of audio. If not, there are some brilliant tutorials out there – we’ll be writing some of our own guides soon!

Pre-production check-list:

  1. Your microphone is close to the source. But not too close – nobody should be making out with the mic. 10-20cm is a good distance.

    If this isn’t particularly easy to achieve, have a listen before you record. If you don’t, it’s almost impossible to remove them in post. So plug in a pair of headphones, and ensure:

    • The target isn’t drowned out by the background noise. If you can’t check, go somewhere quiet.
    • The target isn’t echo-ey (the bathroom effect). Is their speech nice and clear?

      If any of the above are true, move the microphone closer.

  2. Ensure that you’ve got enough microphones. Try and get the Zoom, not the Tascam, as this lets you plug in more mics. Make sure:
    1. You have a different microphone for everyone talking. For instance, your interviewee has a handheld (with better quality), and you have the portable recorder
      OR
    2. You have the one microphone closest to your interviewee. You can always re-record your questions later on, but obviously not theirs.
  3. If outside, you have a windshield on your microphones to prevent that yuck whooshing sound.
  4. Check the levels before you record.
    1. When your guests speak, the level ideally shouldn’t go above 75% on the VU (volume unit) meter.
    2. It shouldn’t be normally below 40%, as for technical digital recording reasons your quality becomes lower & noisier.
  5. Record phone calls using the unit in the studio, not off a mobile phone. Cell tower quality is really poor.
  6. If you’re shooting video:
    1. Avoid using just the shotgun microphone on your camera. The audio from these is almost always unusable. Give your presenter a handheld, use a clip-on/wireless mic, or find a boom operator.
    2. If covering an event, ask the organisers ahead of time if they can provide you with an audio feed. The Union are usually willing to do this. You can probably plug the XLR directly into your camera.


Once you have the audio back in the edit suite, import it into Audacity and split all the tracks into mono. This’ll make mixing easier.

Post-production checklist:

  1. The overall levels are OK. The volume shouldn’t go between loud and quiet across different segments. You can apply some compression to achieve this, or use Audiomatic on your final mix to master the audio.
  2. Speech isn’t panned to the left or right. Put on a pair of headphones – if one of your ears receives special treatment, ensure the audio tracks are split to mono.
  3. The average volume of your clip, in Audacity, sits at about 80% height on the blue wave form (or, when you play it, doesn’t go above -4 on the green meters). Try to avoid red vertical lines, as these represent clipping (which your audience can hear as distortion).

You can fix some of these issues using Audiomatic – an internal tool we built specifically to help you do this with minimal effort. If you’re not an Insanity member, you can achieve a similar effect using Stereo Tool and the Syrtho preset – our tool is just a shortcut for this.